CPU Unit
The CPU unit is a fully functional computer (a Tablet PC) which runs the RSWA software.
Features
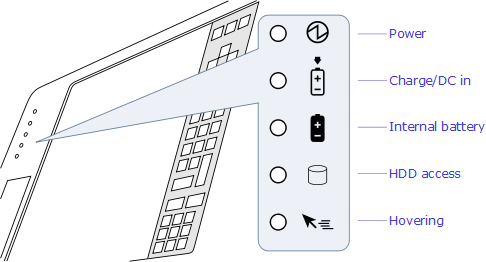
Status Indicators
Status indicators show the status of system functions such as system power and internal battery charge level. The location of these indicators is shown below.
System States
On Mode - The system is running and the display screen is on.
Idle Mode - Some system functions are regulated or turned off to conserve power. The display screen may be turned off. The system returns to the On state when pen activity or other input is detected.
Suspend-to-RAM Mode - System operation is suspended. Most system functions are turned off to conserve power. Power to memory is on, maintaining data in programs that were running before system operation was suspended. The system does not respond to the pen or other input when in Suspend-to-RAM mode. Push the power button return back to On state.
Save-to-Disk Mode - System operation is suspended. All system functions are turned off to conserve power. Active data in programs that were running before suspending system operation is stored on the hard disk drive. The system does not respond to the pen or other input. Push the power button return back to On state.
Off Mode - All system functions are turned off to conserve power. The system does not respond to the pen or other input. The system boots at the next system power-on.
The system consumes the same amount of power whether it is in Save-to-Disk mode or Off mode.
Your system can be configured to enter some of these states automatically after a period of inactivity to conserve battery power.
Screen protector
Using a screen protector will help insure that the screen remains as clear as possible. When installed, the screen protector becomes a durable, replaceable surface that protects the display from abrasion.
The tablet PC is not waterproof. Do not pour liquids on the system or wash it with a wet cloth.
To install a new screen protector:
- If a screen protector is already installed on the display screen, remove it before installing the new screen protector. The screen protector is held onto the display screen surface by a thin strip of adhesive around the edges. A notch in one corner of the screen protector allows you to slide your fingernail under the screen protector for easy removal.
- Clean the display by wiping the screen surface gently using a soft cotton cloth dampened with denatured alcohol. Ensure that all residues have been removed from the screen before applying a new screen protector.
- Remove the protective coating from the adhesive side of the screen protector first. Apply the screen protector to the display screen surface. When doing so, orient the screen protector with the adhesive side of the screen protector facing the display screen and the notched corner of the screen protector toward the lower left corner of the display screen.
- Apply pressure to the screen protector with your finger using a continuous wiping motion along the edges. The adhesive sets completely within 48 hours. To ensure a good seal between the screen protector and the display, do not lift the screen protector from the display once it has been applied.
- Remove the protective plastic cover from the face of the screen protector.
- Clean any residue remaining on the screen protector by wiping gently with a soft cotton cloth dampened with denatured alcohol. Wipe the screen protector with a soft dry cloth to remove any low-tack adhesive.
Storing
Store the equipment in the Off state with a fully charged external battery installed. The external battery always provides power to some system components even when the system is in the Off state. If the system is stored with the external battery removed, these components are powered by the system’s internal battery. The internal battery is not designed for extended use and will discharge in a short period of time; this could result in damage to the internal battery. You can store the equipment in the Off state for about 30 days with a fully charged external battery installed. After this period, the external battery pack should be recharged or replaced with a charged external battery.
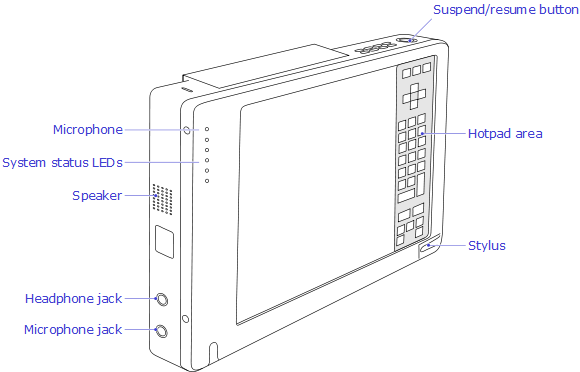
Using the Hotpad
The hotpad area consists of several touch screen “keys” on the right side of the system display that you can use to change several settings. The hotpad allows you to:
- Adjust the display and speaker settings
- Invoke right mouse button
- Invoke hovering capability
- Use as a numeric pad
- Use as a NumLock key
To use a hotpad key, tap directly on it with the pen. You can also press and hold the pen tip against the Volume and Brightness hotpad keys to automatically repeat the previous hotpad function. The location of each hotpad key is shown in the table below.
| Icon | Name | Description |
|---|---|---|
 | Escape | Functions the same as the Esc key on a typical keyboard |
 | Display | Each time the Display Device hotpad key is tapped, the display unit is switched (in the following order): LCD → CRT → both LCD and CRT → back to LCD |
 | NumLock | Acts in the same way as the NumLock on the keyboard (default is Off) |
 | Cursor Control | Acts in the same way as the cursor keys on a keyboard |
 | Numeric Keypad | Acts in the same way as the numeric keypad on a keyboard (note: "BS" signifies "Backspace") |
 | Right Mouse Button | Switches the pen function from left mouse button to right mouse button emulation for a single mouse event after tapping the hotpad |
 | Pen Hovering | Switches the hovering mode on or off; throughout the hovering mode, the hovering status indicator is lit green |
 | Speaker Volume | Decrease/Mute/Increase the speaker volume |
 | Brightness Control | Changes the luminance of the display backlight; changes in brightness level can be monitored with the on-screen indicator |
Using Hovering Mode
Selecting the pen hovering icon on the keypad provides the user with better cursor control. When the hovering option is enabled, the cursor can be positioned over an icon without activating it. This is useful when you are performing procedures that require accurate cursor positioning, such as when simulating a mouse rollover, selecting a small icon, or beginning a paint session.
- To enable hovering, tap the Pen Hovering icon on the keypad. The Hovering system status indicator light illuminates green when hovering is selected.
- To disable hovering, tap the Pen Hovering icon again. The Hovering system indicator light is off when hovering is not selected.