RIWA UAC Auto Launch, Disk Monitor, and CLI Tool
Overview
This document contains instructions on how to setup auto launch and the disk monitor provided with the RIWA UAC, along with how to utilize the included RIWA UAC CLI tool.
Auto Launch
- v1.14.0 and Newer
- v1.0.0 to v1.14.0
- v0.257.0 and Earlier (Deprecated)
To have the RIWA UAC launch on boot, you will need to run the following command in a terminal window:
riwa enable
This will now launch the RIWA UAC software every time you start up your device.
To disable the RIWA UAC from launching on boot, run the following command in a terminal window:
riwa disable
To have the RIWA UAC launch on boot, you will need to run the following command in a terminal window:
sudo riwa enable
This will now launch the RIWA UAC software every time you start up your device.
To disable the RIWA UAC from launching on boot, run the following command in a terminal window:
sudo riwa disable
For Obara Analyzer (Obara App) and TF-Bridge
RIWA-UAC can be installed as a service using "Auto Launch". RIWA-UAC as a service means that the application will always be running in the background. Consequently this will mean that the application cannot be ran in the foreground (from the terminal). For more on Linux Services please see Services Explained.
To enable RIWA-UAC as a service
Once an application is registered the following constraints are imposed:
- The application will be launched on boot;
- The application will be restarted if the process terminates;
- If another instance of the application is started it will be terminated such that there is always exactly one instance of this application active at a time; and
- The application will run in the background.
Please note that this procedure will not work for GUI applications.
The steps to use it are as follows:
- Navigate to the directory containing the
application_watchdog.shscript in your terminal. The script can be found in the software package. - Execute the script using the following command format:
sudo ./application_watchdog.sh <application>
Replace <application> with the name of the software you wish to start automatically.
- For Example: To configure
obara_appandtf_bridge_appto start automatically, run these commands:
sudo ./application_watchdog.sh obara_app
sudo ./application_watchdog.sh tf_bridge_app
For RIWA2 Live Monitor
The following is for GUI Based Applications
Auto Launch can also be enabled for the RIWA2 Live Monitor application by configuring your "Startup Application Preferences" using the gnome-sessions-properties command.
To do this see the following:
-
Open a terminal instance (can be found under applications)
-
Type
gnome-sessions-propertiesinto the terminal and press "enter" -
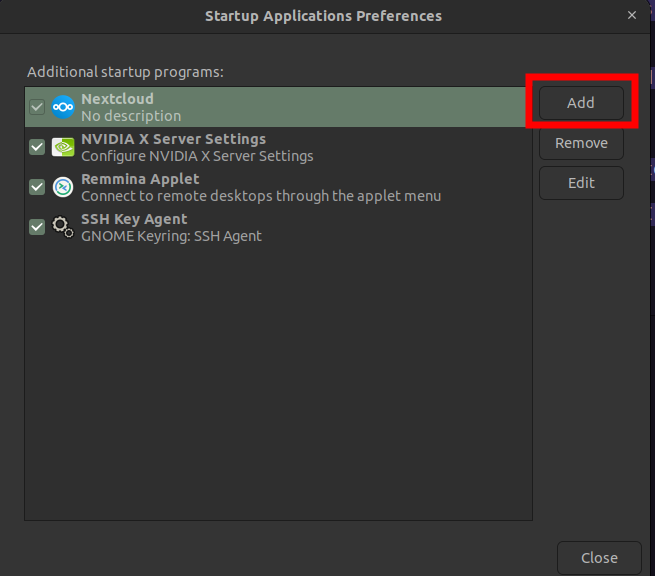
Click "Add"
-
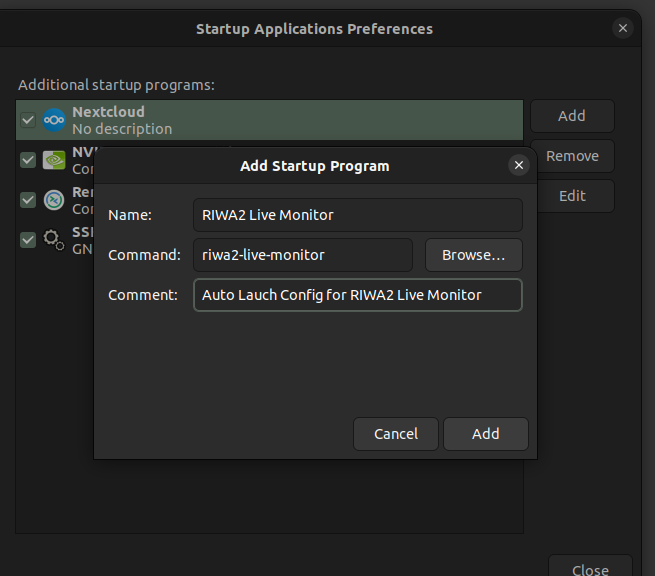
Enter the fields as shown below and then press add
-
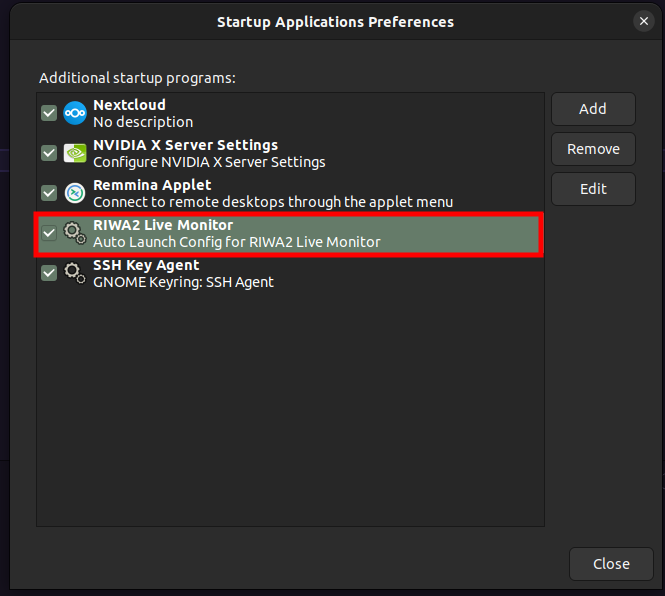
Confirm RIWA2 Live Monitor has been added by reviewing the startup list
-
Restart PC and verify the RIWA2 Live Monitor launches during the reboot.
Viewing Watchdog Service Logs
In order to view and check the behavior of an application added by watchdog for debugging or reporting, do the following:
-
Open a terminal.
-
Execute the command:
sudo journalctl -fu watchdog_$(echo "<application>" | sha256sum | cut -d ' ' -f1)Replace
<application>with the name of the software you wish to view the logs. -
For example: To view the logs for tf_bridge_app, execute the following command:
sudo journalctl -fu watchdog_$(echo "tf_bridge_app" | sha256sum | cut -d ' ' -f1)
Remove Auto launch
To remove the RIWA-UAC software from launching automatically at startup, use the provided remove_watchdog.sh script. This script safely cleans up the systemd service and launcher created by application_watchdog.sh.
Steps to Remove:
- Open a terminal and navigate to the directory containing
remove_watchdog.sh. - Run the script using the exact same command that was originally passed to
application_watchdog.sh. For example:- If you previously added obara_app using:
sudo ./application_watchdog.sh obara_app - then remove it with:
sudo ./remove_watchdog.sh obara_app
- If you previously added obara_app using:
Ensure that the command string matches exactly, including any absolute paths (e.g., /usr/bin/obara_app), or the script will not locate the correct service to remove.
Disk Monitor
- v1.14.0 and Newer
- v1.0.0 to v1.14.0
- v0.257.0 and Earlier (Deprecated)
As the system generates logs continuously throughout the day, it's important to prevent excessive disk usage. To automate this, we provide options that set up a cron job to monitor a specified directory and remove the oldest files when a size threshold is exceeded.
To set up one of these cron jobs, run the following command in the terminal:
riwa disk enable <dir> <threshold%>
Where <dir> is replaced with the path to the directory you want to monitor, while <threshold%> is to be replaced with the value you wish to have the monitor start deleting logs given the folder size is to exceed the total disk space.
To delete all the cron jobs, run the following command in the terminal:
riwa disk disable
As the system generates logs continuously throughout the day, it's important to prevent excessive disk usage. To automate this, we provide options that sets up a cron job to monitor a specified directory and remove the oldest files when a size threshold is exceeded.
To setup one of these cron jobs, run the following command in the terminal:
sudo riwa disk enable <dir> <threshold%>
Where <dir> is replaced with the path to the directory you want to monitor, while <threshold%> is to be replaced with the value you wish to have the monitor start deleting logs given the folder size is to exceed the total disk space.
To delete all the cron jobs, run the following command in the terminal:
sudo riwa disk disable
Setting up Disk Monitor
As the system generates logs continuously throughout the day, it's important to prevent excessive disk usage. To automate this, we provide a script that sets up a cron job to monitor a specified directory and remove the oldest files when a size threshold is exceeded.
This setup includes:
-
Cron Job Setup Script (Bash)
This script ensures your Shell cleanup script runs every 10 minutes. It adds the cron job only if it doesn't already exist. It is included inside the software package provided inside the
disk_monitorfolder. -
Shell Cleanup Script
This Shell script monitors the specified directory and deletes the oldest files if the total size exceeds a given percentage of available disk space. This is also included in the
disk_monitorfolder.
Example Usage
Open the terminal in the directory where both the files are located (they are usually inside the disk_monitor folder) and then execute the following:
sudo ./add_monitor.sh ./monitor_disk.sh /root/.local/tessonics/riwa2/logs 60 5
Please provide the full path to the script file, not the command itself. For example: if the file is located in a folder named disk_monitor inside your home directory, use the path:
~/disk_monitor/monitor_disk.sh.
For better organization, we recommend copying the folder from the package to your home directory before proceeding.
This will:
- Run the Shell script every 5 minutes.
- Monitor
/root/.local/tessonics/riwa2/logs. - Keep disk usage at 60% of the filesystem size.
- Automatically delete oldest files when the directory exceeds 60% of disk space.
- Logs output to
/var/log/monitor_disk.log.
Removing Disk Monitors
To remove a job, use the other script that is provided in the file remove_monitor.sh.
To execute the script, open a terminal in the directory where it is located:
sudo ./remove_monitor.sh
The remove_monitor script is not required during the initial setup.
RIWA Tools and CLI
- v1.14.0 and Newer
- v1.0.0 to v1.14.0
- v0.257.0 and Earlier (Deprecated)
Accessing RIWA CLI Tools
To view the additional services / tools offered by the RIWA system, start by right-clicking on the desktop and pressing the Open In Terminal button which will open up a new terminal window.
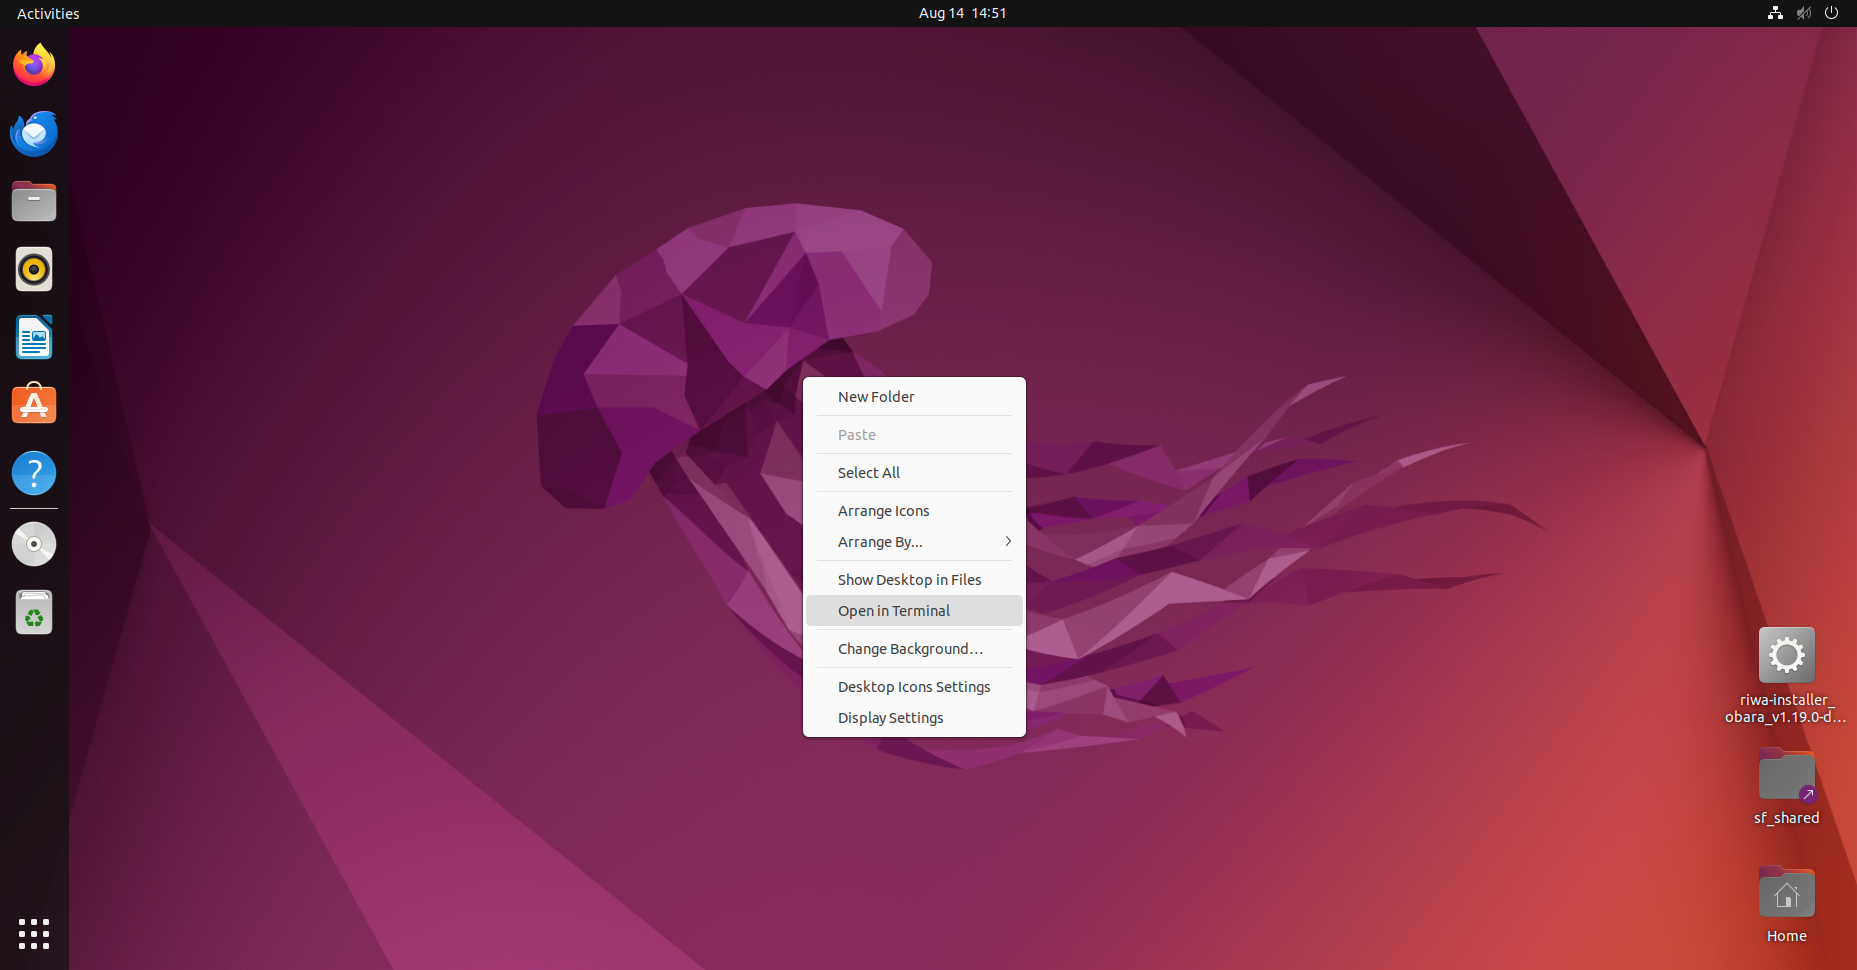
From here, you can view the additional services / tools offered by typing the following into the terminal:
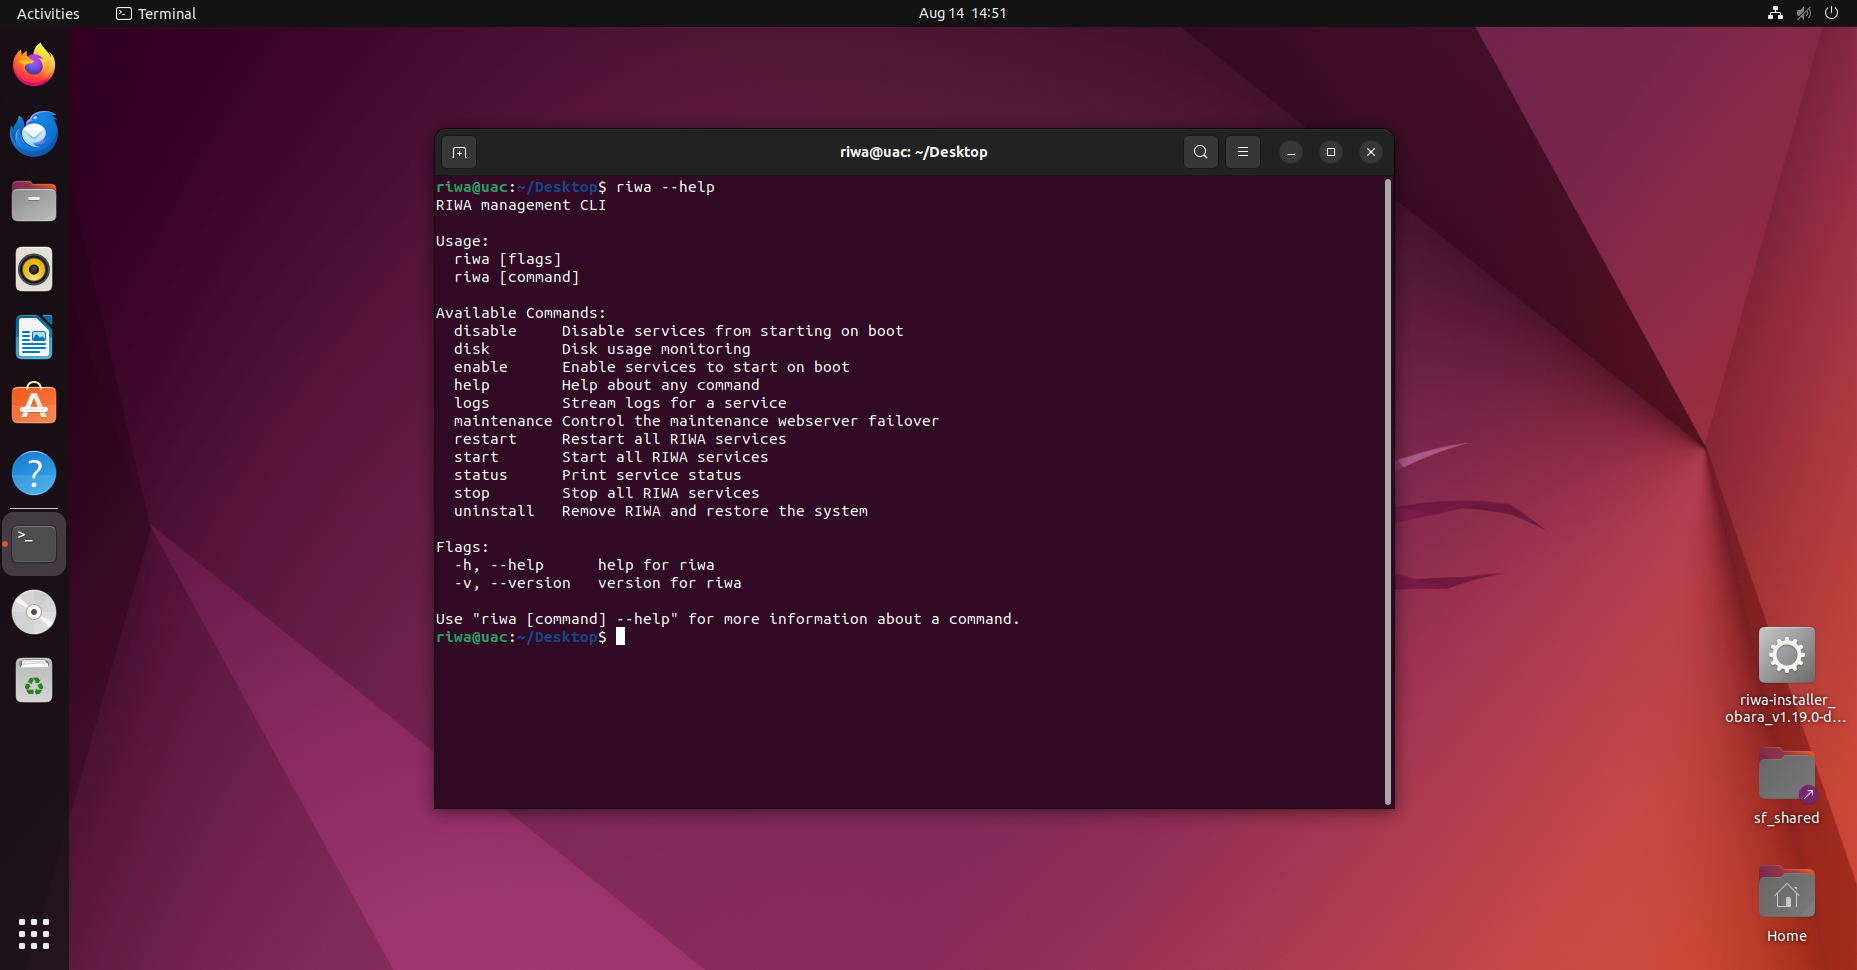
riwa --help
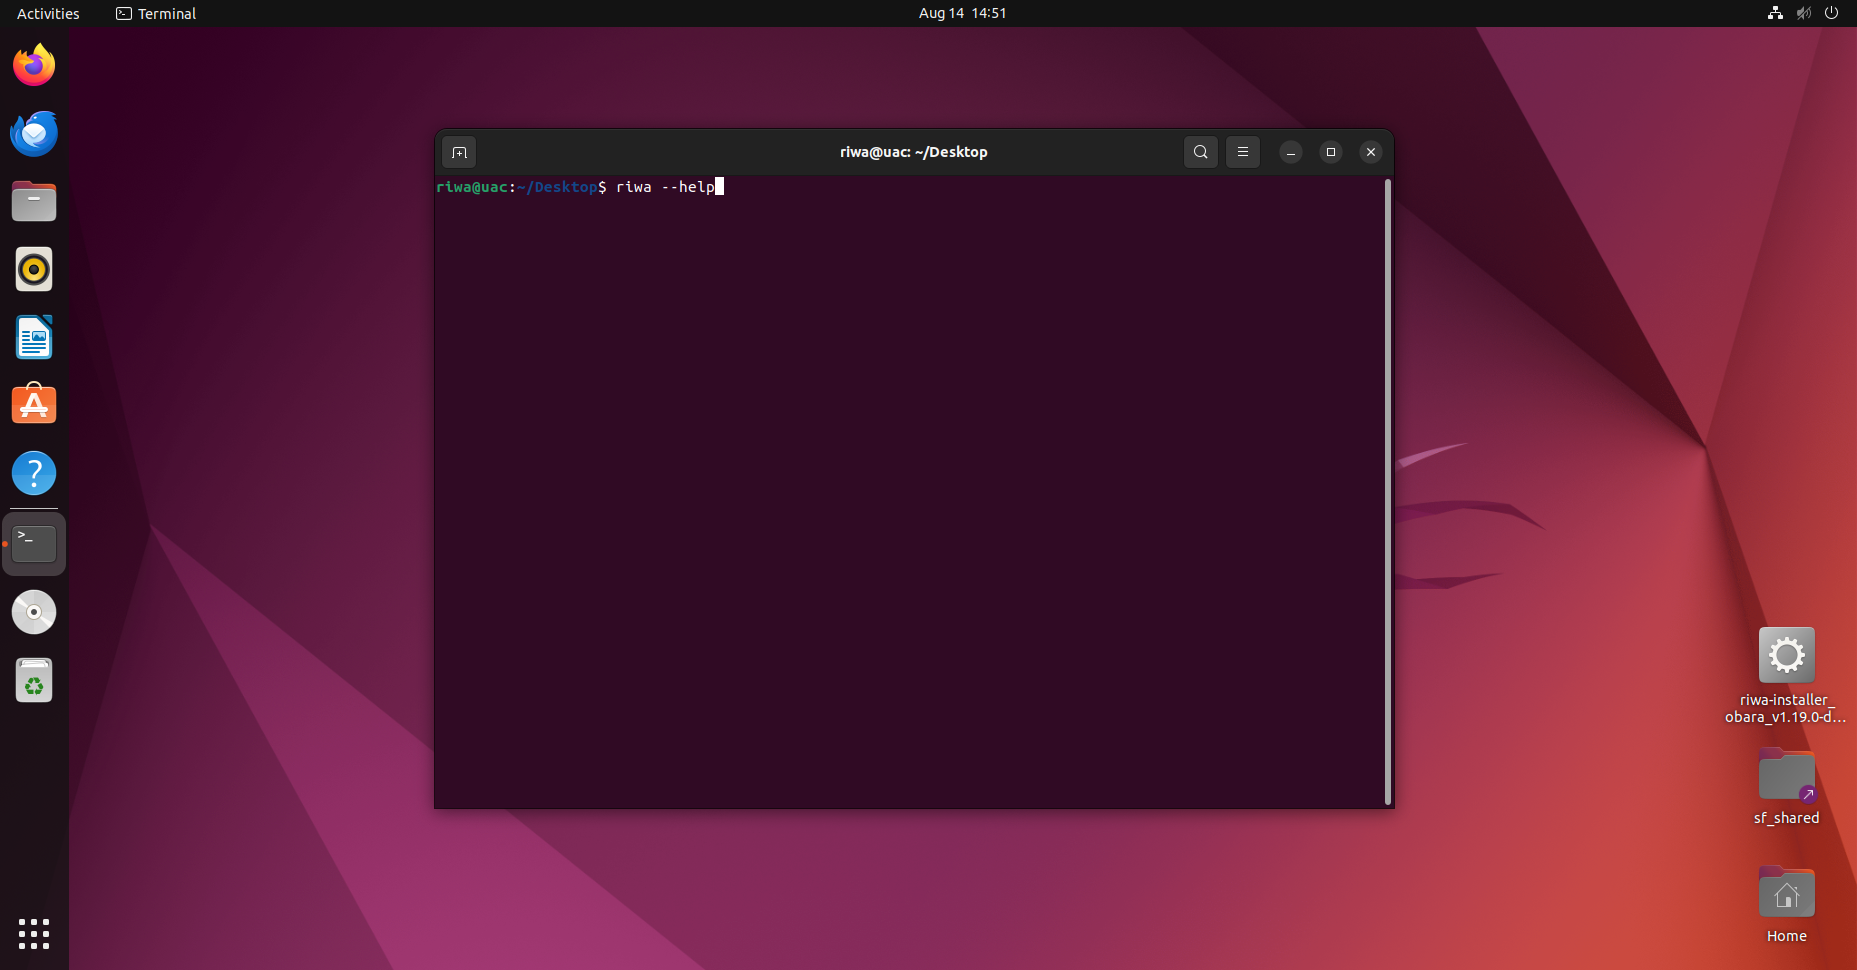
By typing this command into the terminal, the terminal should prompt you with a list of services and maintenance options to help use and track your RIWA system.
For in-depth details regarding the services offered with your RIWA system, please refer to the Services section of this documentation.
For in-depth details regarding the maintenance options offered with your RIWA system, please refer to the Maintenance section of this documentation.
RIWA Services
To run any RIWA service command, use the following structure:
riwa [option]
The option parameter is to be replaced with any of the options listed below (options listed inside <> indicate they are required):
start           // Start all RIWA services
stop            // Stop all RIWA services
restart         // Restart all RIWA services
status          // Prints the current status of all RIWA services
logs <service>  // Prints out the logs in real time for a RIWA service
enable          // Enables all RIWA services to start on boot
disable         // Disables all RIWA services from starting on boot
RIWA Maintenance
To run any RIWA maintenance commands, use the following structure:
riwa [option]
The option parameter is to be replaced with any of the options listed below (options listed inside <> indicate they are required, while options listed inside [] indicate they are optional):
uninstall [--keep-db]               // Removes all RIWA software from the host device.
backup [<dir>] [--host] [--port]    // Saves a backup of the RIWA's current database
disk enable <dir> <threshold%>      // Enables a disk monitor which notifies users when a threshold has been reached
disk disable                        // Disables any previous set up disk monitors
--help                              // Prints out the help message shown above
--version                           // Prints out the RIWA version currently installed on the host system
RIWA CLI
The RIWA CLI is a tool offered alongside the RIWA system which allows the user to easily manage their RIWA services through the use of a tool integrated with the user's terminal.
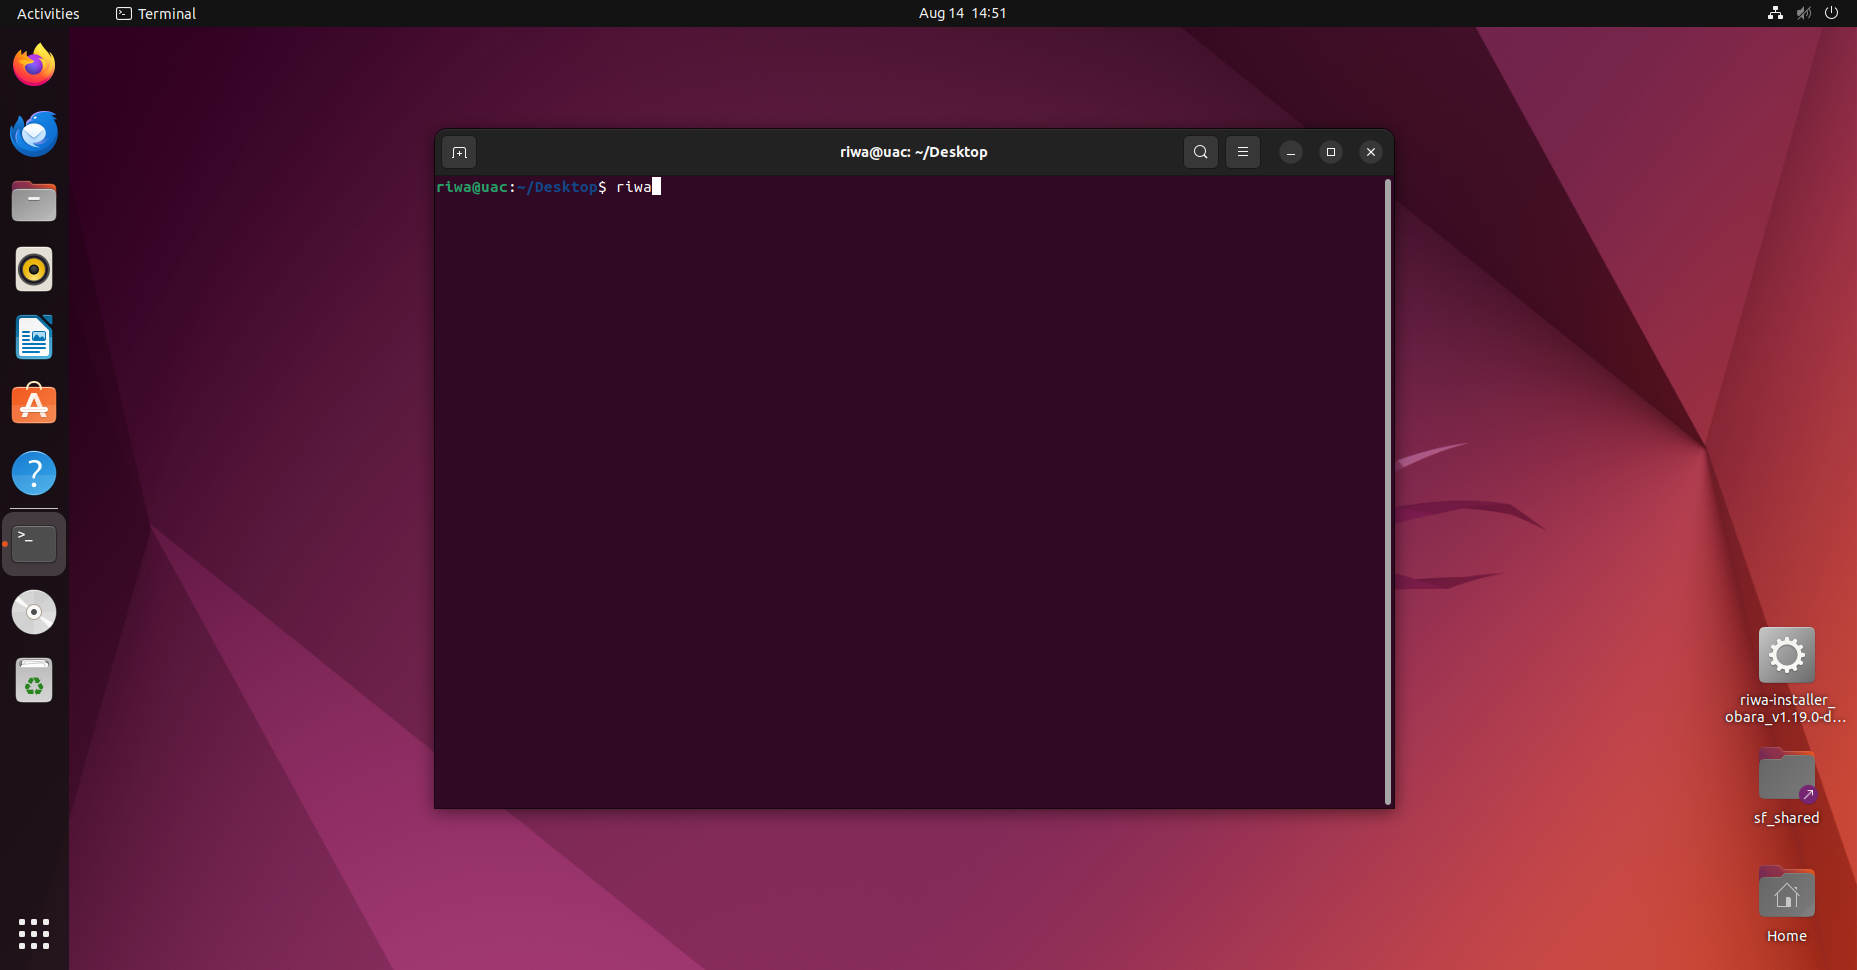
To run the RIWA CLI, users must run the following command in their terminal:
riwa
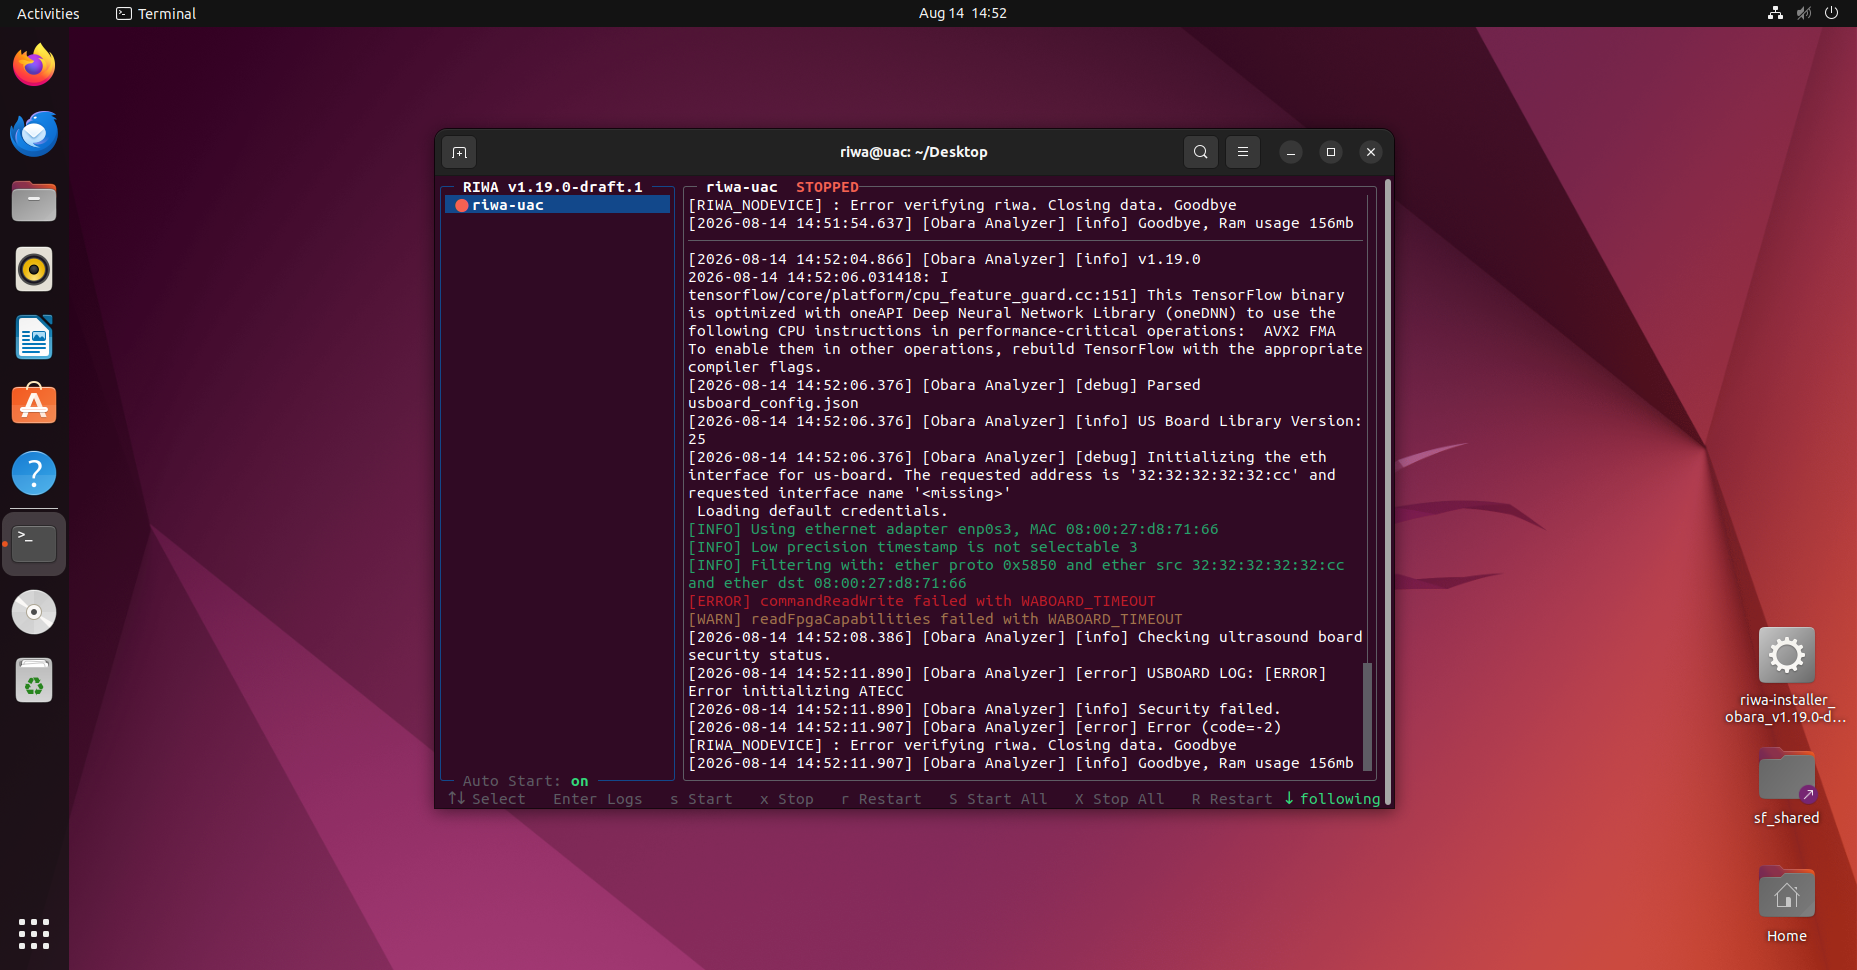
After launching the RIWA CLI, users will see two main sections inside their terminal; on the left side bar, users will see a list of the installed RIWA services on their system alongside a coloured indicator for their current status. The second larger section of the RIWA CLI, shows an active log of the current messages being sent by the RIWA system. This can include things such as service shutdowns, errors, etc.
A green circle beside a service indicates the service is online, whilst a red circle beside a service indicates the service is offline.
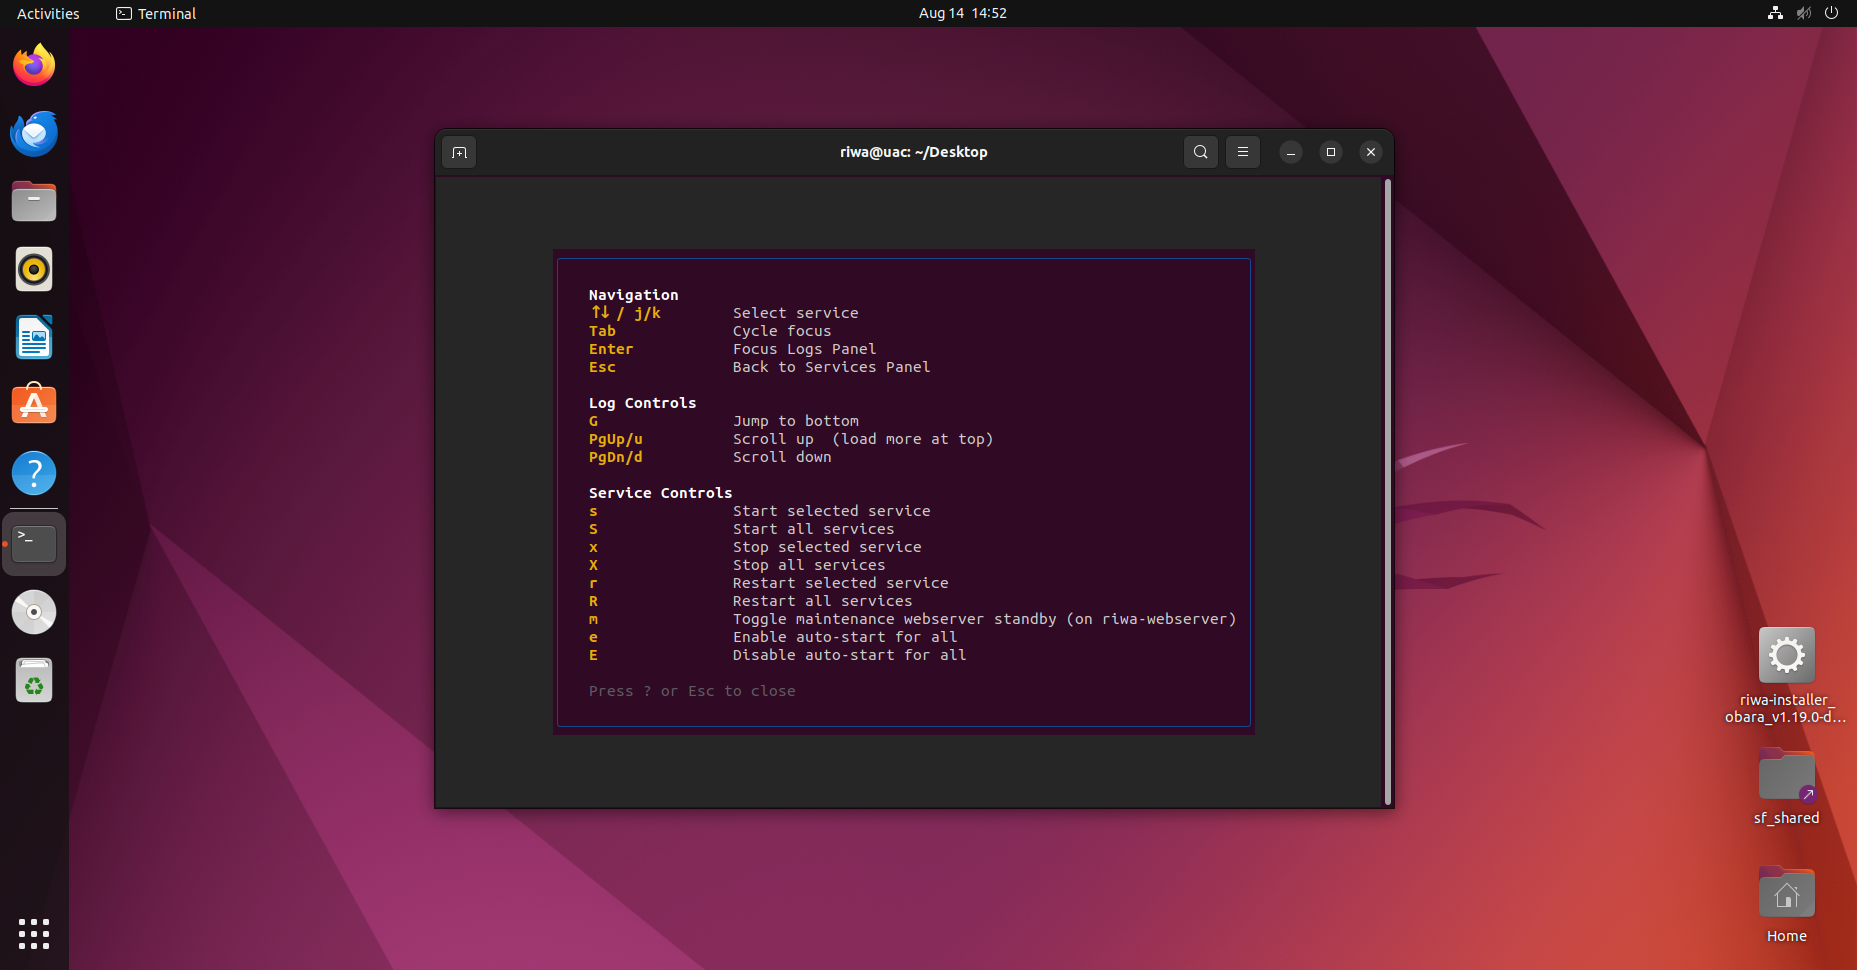
To navigate through the RIWA CLI, a handful of keybinds have been integrated with the software to better use the system. To access these keybinds, users must press ? on their keyboard. After pressing the question mark on their keyboard, users will see a message similar to the following which indicates each keybind integrated with the system and their purpose:
There are specific keybinds for the two main sections mentioned above which are shown at the bottom of the RIWA CLI. Please refer to those keybinds alongside those listed in the image below.
Accessing RIWA CLI Tools
To view the additional services / tools offered by the RIWA system, start by right-clicking on the desktop and pressing the Open In Terminal button which will open up a new terminal window.
From here, you can view the additional services / tools offered by typing the following into the terminal:
sudo riwa --help
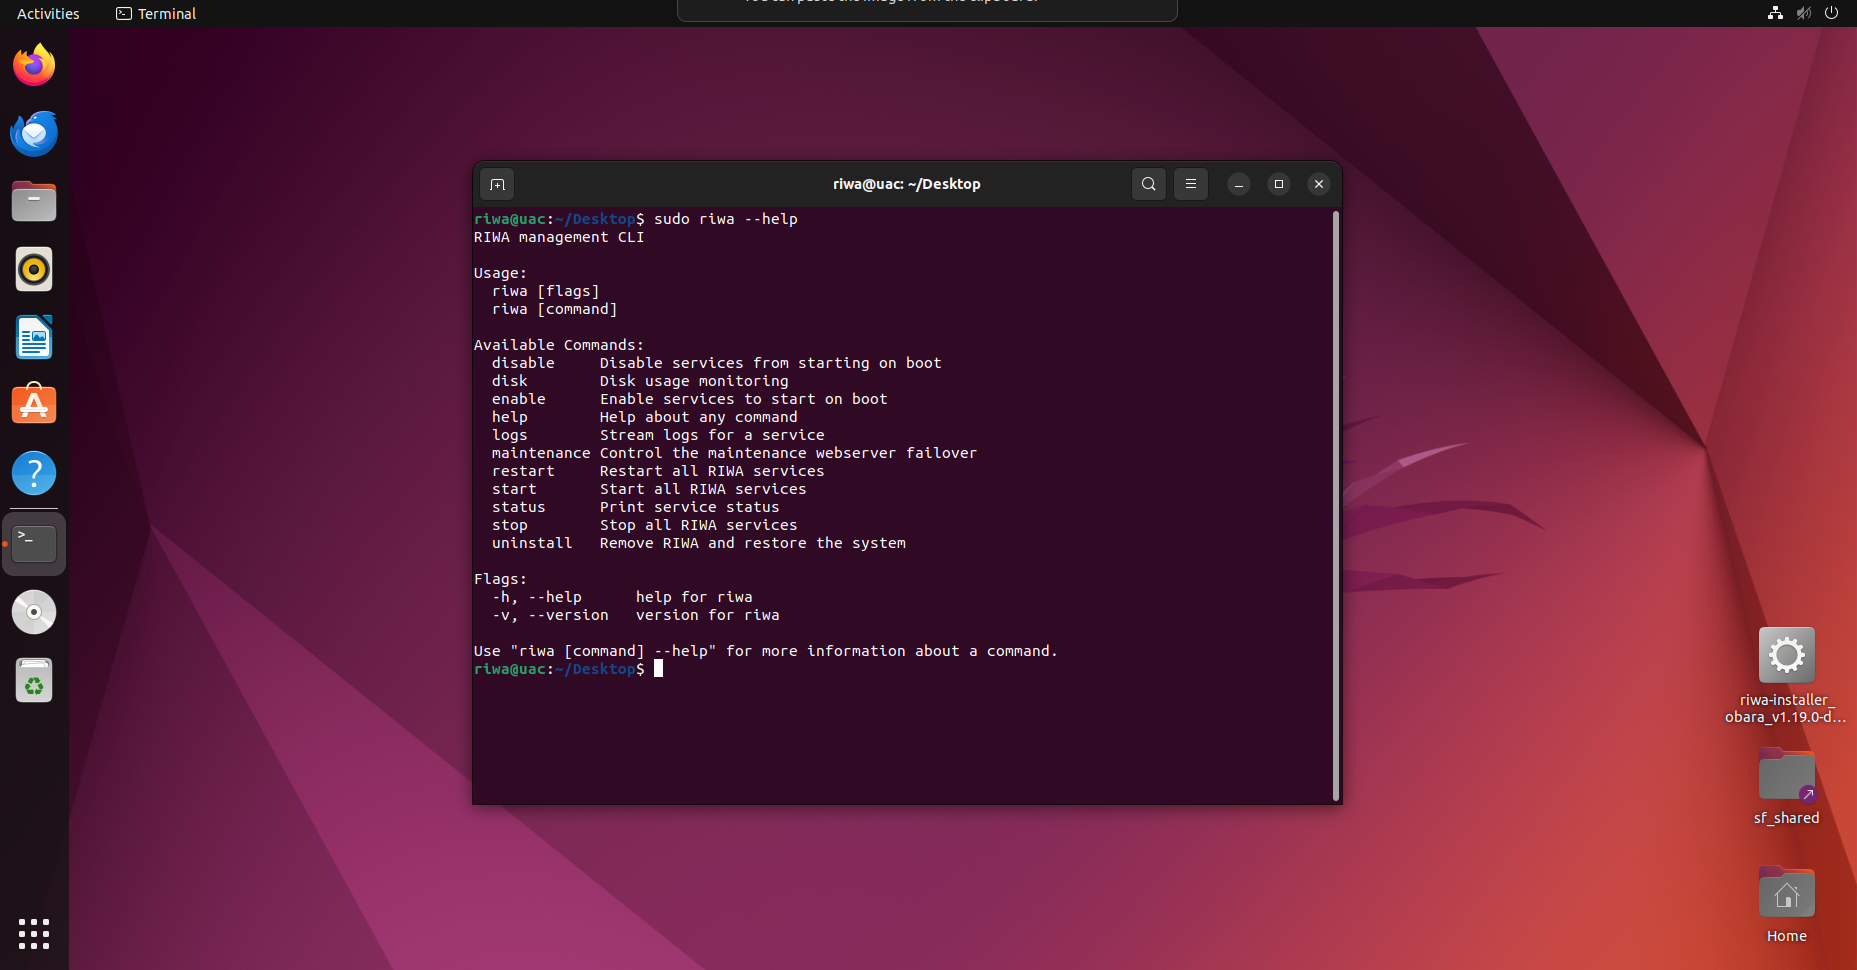
By typing this command into the terminal, the terminal should prompt you with a list of services and maintenance options to help use and track your RIWA system.
For in-depth details regarding the services offered with your RIWA system, please refer to the Services section of this documentation.
For in-depth details regarding the maintenance options offered with your RIWA system, please refer to the Maintenance section of this documentation.
RIWA Services
To run any RIWA service command, use the following structure:
sudo riwa [option]
The option parameter is to be replaced with any of the options listed below (options listed inside <> indicate they are required):
start           // Start all RIWA services
stop            // Stop all RIWA services
restart         // Restart all RIWA services
status          // Prints the current status of all RIWA services
logs <service>  // Prints out the logs in real time for a RIWA service
enable          // Enables all RIWA services to start on boot
disable         // Disables all RIWA services from starting on boot
RIWA Maintenance
To run any RIWA maintenance commands, use the following structure:
sudo riwa [option]
The option parameter is to replaced with any of the options listed below (options listed inside <> indicate they required, while options listed inside [] indicate they are optional):
uninstall [--keep-db]               // Removes all RIWA software from the host device.
backup [<dir>] [--host] [--port]    // Saves a backup of the RIWA's current database
disk enable <dir> <threshold%>      // Enables a disk monitor which notifies users when a threshold has been reached
disk disable                        // Disables any previous set up disk monitors
--help                              // Prints out the help message shown above
--version                           // Prints out the RIWA version currently installed on the host system
RIWA CLI
The RIWA CLI is a tool offered alongside the RIWA system which allows the user to easily manage their RIWA services through the use of a tool integrated with the user's terminal.
To run the RIWA CLI, users must run the following command in their terminal:
sudo riwa
After launching the RIWA CLI, users will see two main sections inside their terminal; on the left side bar, users will see a list of the installed RIWA services on their system alongside a coloured indicator for their current status. The second larger section of the RIWA CLI, shows an active log of the current messages being sent by the RIWA system. This can include things such as service shutdowns, errors, etc.
A green circle beside a service indicates the service is online, whilst a red circle beside a service indicates the service is offline.
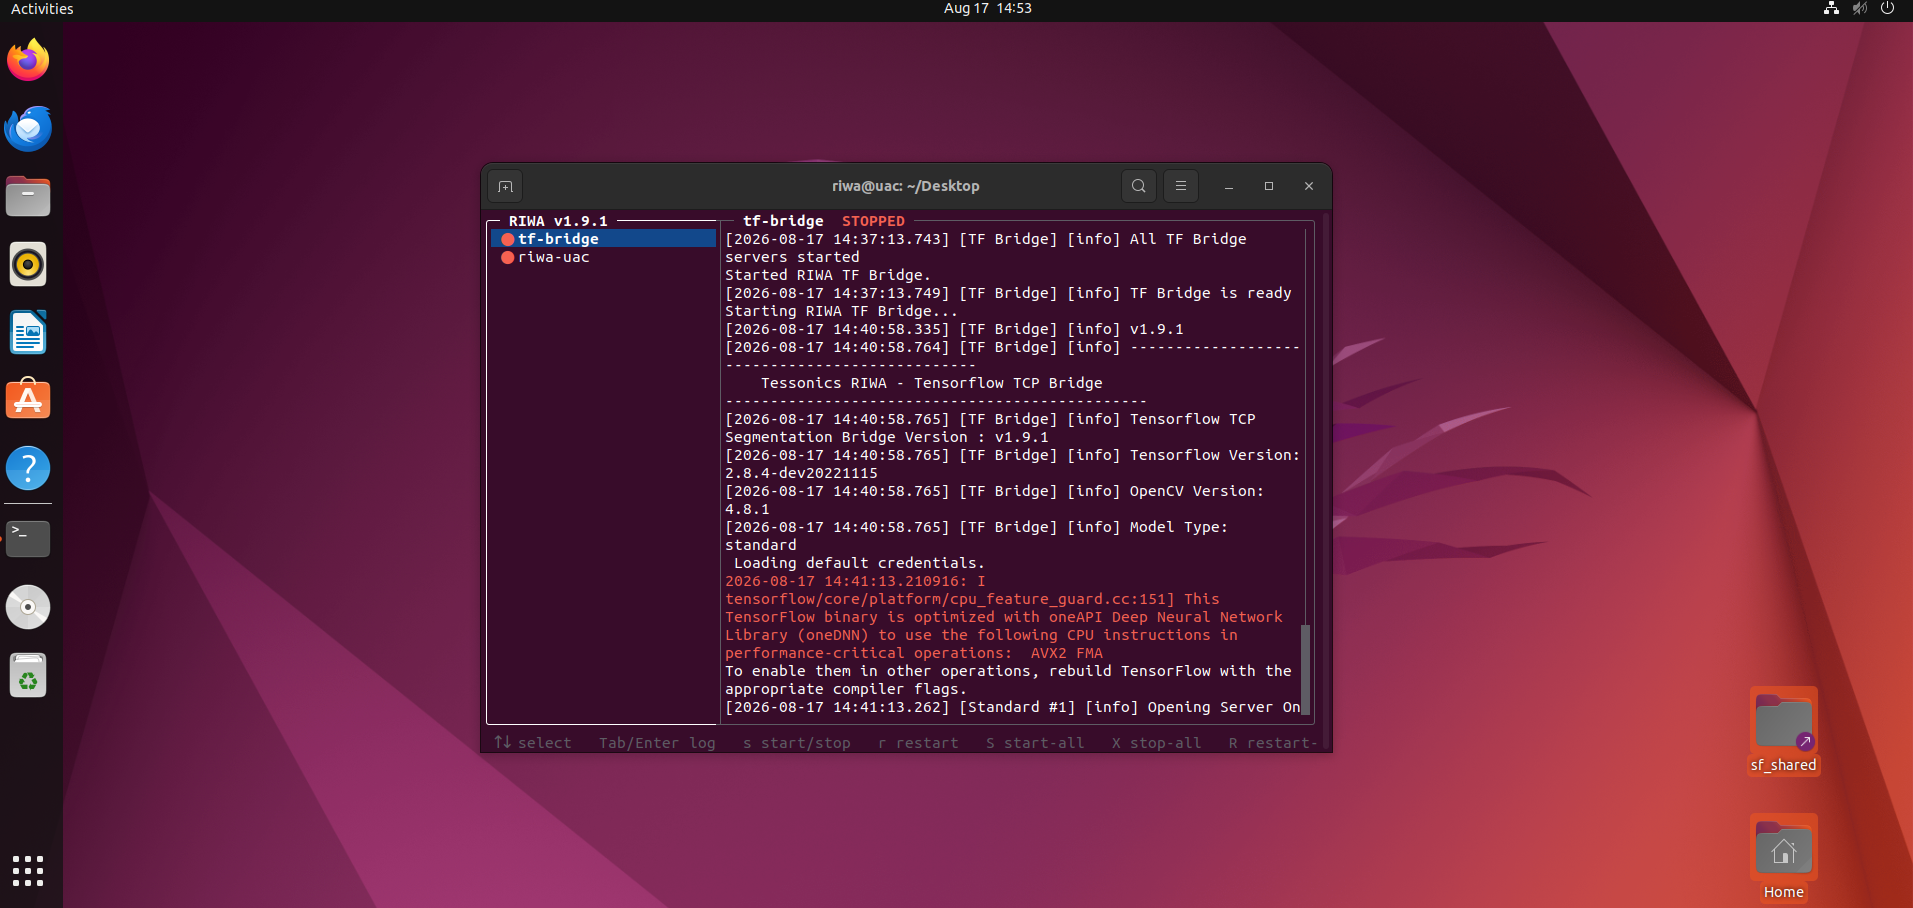
To navigate through the RIWA CLI, a handful of keybinds have been integrated with the software to better use the system. To access these keybinds, users must press ? on their keyboard. After pressing the question mark on their keyboard, users will see a message similar to the following which indicates each keybind integrated with the system and their purpose:
There are specific keybinds for the two main sections mentioned above which are shown at the bottom of the RIWA CLI. Please refer to those keybinds alongside those listed in the image below.
The RIWA UAC CLI is not available with versions 0.257.0 and earlier. It is recommended you install a newer RIWA UAC for access to these tools.