RIWA Config
This module riwa_config.exe is a GUI application to prepare settings for riwa_client.exe module, saved in two files: riwa_client_task.xml and riwa_client.ini.
When started it will use current folder as working folder. In working folder the module expects to find two above configuration files. If one or both files are not found then the module will create them and save in the working folder. In the settings we have three major groups of parameters: Settings Parameters, Weld List Table and Weld Parameters Table.
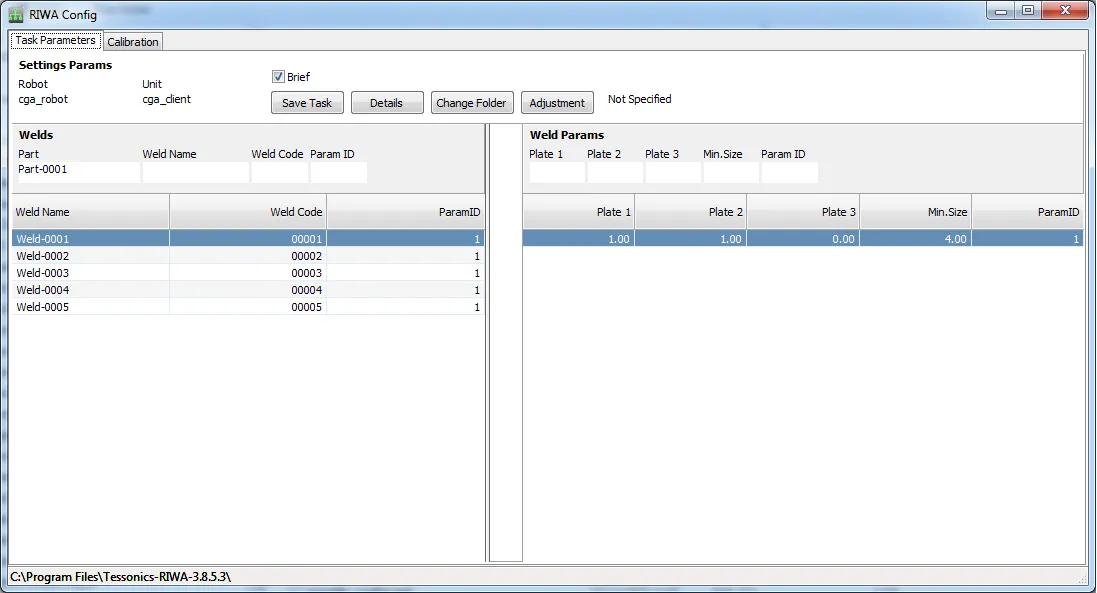
Weld List Table
Weld list has all welding spots from the robot's schedule, where:
weld nameis alphanumeric value identified the weld;weld code(program number) is numeric value the weld spot has in the schedule and this value will be sent to the riwa_client as a weld code; andparam idis reference number to the RIWA welding parameters in the list of Weld Parameters.
Add/Change Dta in the Weld List
- Click on the existing line, this will copy data into the edit fields above the table.
- Enter values in fileds.
- Over the table click right mouse button and select "Add" option, new line in the table will appear or select "Change" option, the existing line will be changed.
To delete a given line: click right mouse button and select "Delete" option, the existing line will be deleted.
Import/Export Data in the Weld List
To export Weld List data - click right mouse button and select "Export" option, all lines will be saved to text file named WeldListExport.txt.
To import Weld List data do the following:
- Rename file
WeldListExport.txttoWeldListImport.txt. - Open file
WeldListImport.txtusing windows Notepad. - Add/change data in the file, where each line contains:
weld name,weld codeandparam id, separated by commas. - Save all changes to the file.
- Go back to the module.
- Click right mouse button and select "Import" option, all lines from the
WeldListImport.txtfile will be copied to the Weld List table.
Weld Parameters Table
Weld Parameters has all RIWA welding parameters needed for the processing, where:
Plate1,Plate2andPlate3are thickness of each plate in the steck, in mm;MinSizeis minimum weld size acceptable, in mm; and- Additional parameters are available in the table shown by "Details" option in the popup menu, majority of them are defaulted and calculated automatically by the module.
Add/Change Data in the Weld Parameters List
- Click on the existing line, this will copy data into the edit fields above the table.
- Enter values in fileds.
- Over the table click right mouse button and select "Add" option, new line in the table will appear.
- Over the table click right mouse button and select "Change" option, the existing line will be changed.
To delete a given line: click right mouse button and select "Delete" option, the existing line will be deleted.
To see Details table: click right mouse button and select "Details" option, the Details table corresponding to the current line will appear.
Import/Export data in the Weld Parameters List
To export Weld Parameters data: click right mouse button and select "Export" option, all lines will be saved to text file named WParamListExport.txt.
To import Weld Parameters data, do the following:
- Rename file
WParamListExport.txttoWParamListImport.txt. - Open file
WParamListImport.txtusing windows Notepad. - Add / change data in the file, where each line contains:
plate1(mm),plate2(mm),plate3(mm) andmin.size(mm), separated by commas. - Save all changes to the file.
- Go back to the module.
- Click right mouse button and select "Import" option, all lines from the
WParamListImport.txtfile will be copied to the Weld Parameters List table.
Settings Parameters
"Settings Parameters" are global parameters for all welds available in the table shown by "Details" button, majority of them are defaulted and calculated automatically by the module. However, these can be changed accurately when needed.
"Adjustment" Button
"Adjustment" button will automatically perform adjustment of ultra sound parameters and save them into the settings, ultra sound board must be available at this time.
"Breaf" Checkbox
"Breaf" checkbox, if checked, stops the module from saving all parameters with default values. It will instead, only save the changed ones.