Set Up TDS
TDS as a Central Server
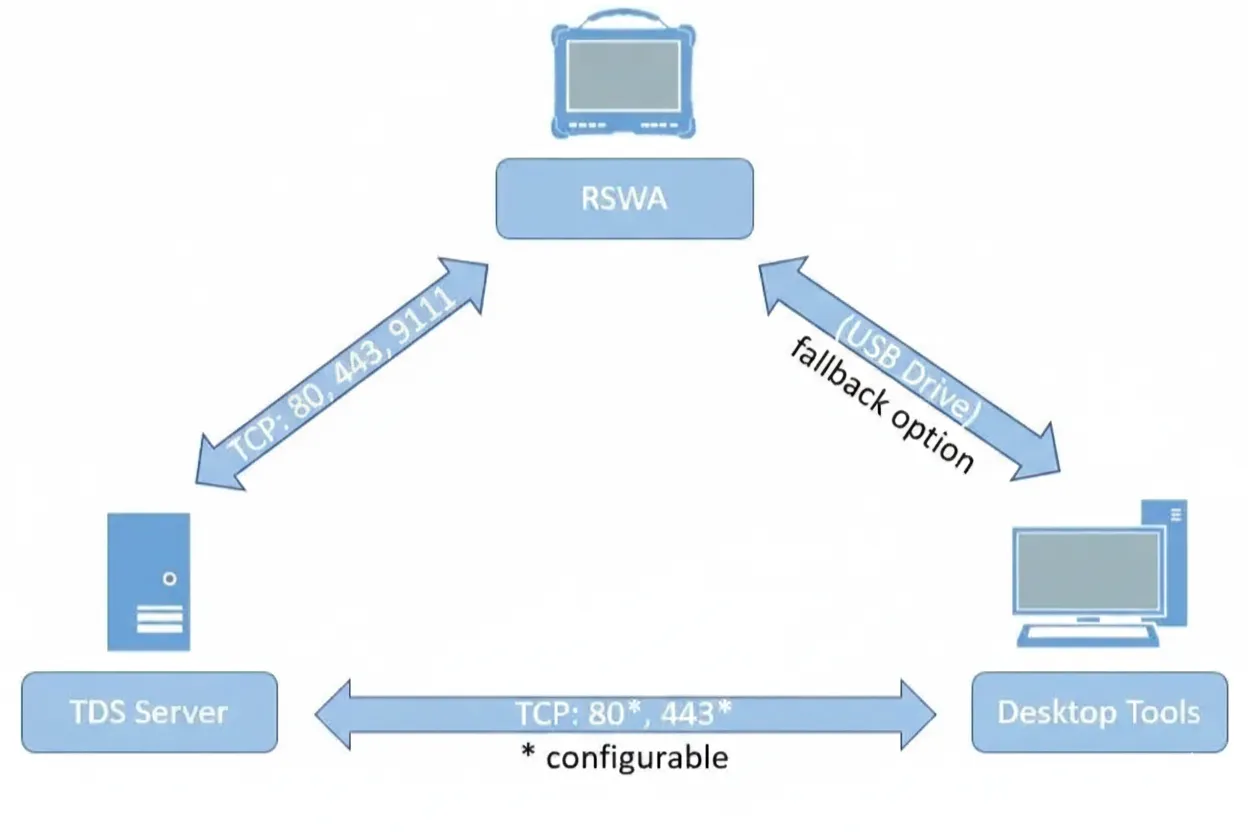
It is common to have a central server with all relevant inspections, parts, groups and users, shared across all computers and RSWA units. This document provides a step-by-step guide on how to configure this for any work environment.
Running the Server as a Windows Service
In most cases, it is advisable to run the TDS server as a Windows Service. This means the server will automatically start when the PC starts and can run without having a user logged in. This is the default case for current installations and will be setup by the installer automatically. If you wish to configure this manually, read on.
This has been made an optional feature for versions 4.8.0 of TDS and newer.
To register it as a service, you will need to open Windows Command Prompt. This will require administrative privileges.
- Click on the Windows Start button, then type
cmdto search for the Windows Command Prompt. Right click on the application and select the option Run as Administrator. - Navigate to the installation folder of TDS -
C:\Program Files\Tessonics\TDS2by default. To do that, type:cd "C:\Program Files\Tessonics\TDS2"and hit Enter. - Run the command
./tds-server.exe service-installand hit Enter. - Close the Windows Command Prompt window.
After that, the TDS server can be controlled through the Windows Service Manager. Click on the Start button, and type service, then select the Services app. The TDS Server will be in the list of services, under the name "Tessonics Data Server".
Run the Server Under a Dedicated Service Account
As mentioned in the Hardware and Software Recommendations section, the TDS Windows Service runs under the Windows LocalSystem account, granting it broad access to local system resources. However, this is not explicitly required, and depending on your IT requirements, you may run TDS under a dedicated service account with only the minimum required permissions.
TDS supports running under either:
- A domain service account (recommended for managed enterprise environments); or
- A local Windows user account (for standalone systems).
The service account does not require administrative privileges.
Minimum Required Permissions
The service account must be granted the following permissions:
Filesystem
- Read/Write/Modify access to:
C:\ProgramData\tessonics- Any user-defined directories configured in TDS.
Service Rights
Permission to log on as a service must be granted to the account.
Network
- Permission to bind to the configured HTTP or HTTPS port (see below to learn how to configure a custom port).
- Ability to accept inbound TCP connections on the configured port.
- Outbound network access as required to communicate with RSWA devices and computers with Desktop Tools installed.
Configuring URL Reservations (Ports 80 / 443)
When running under a non-privileged service account and binding to ports 80 or 443, a URL reservation must be created to allow the service account to bind to the URL.
In the examples below, DOMAIN\username is a placeholder representing the Windows account used to run the TDS service. Replace this with the actual domain or local service account configured in your environment.
For HTTP (Port 80)
The following command should be sufficient:
netsh http add urlacl url=http://+:80/ user=DOMAIN\username
For HTTPS (Port 443)
Run the following command to reserve the URL:
netsh http add urlacl url=https://+:443/ user=DOMAIN\username
Additionally, SSL certificates are required for running over HTTPS. Read more about this here.
Validation Checklist
After changing the service account, verify the following:
- The TDS service starts successfully.
- The UI is reachable on the configured port.
- Database, revision and snapshot files are properly created in the configured directories.
- Outbound communication with RSWA devices and Desktop Tools functions properly.
Initial TDS Configuration
The TDS installer places a tds-server.json inside C:\ProgramData\tessonics\tds2. This JSON-encoded configuration file contains multiple sections with key-value configuration options.
For details regarding the full configurable options, visit here.
The file is inside ProgramData, not "Program Files" or "Program Files (x86)". The ProgramData folder is by default hidden in Windows and requires Administrator privileges to access.
With v4.8.0 and higher, the installer will query basic required configuration such as hostname and port. If these have been setup correctly,
it is not necessary to touch the settings file to get TDS up and running.
For older TDS versions, after the installation, at least the url parameter must be set correctly to have TDS redirect to the right hostname.
In the file C:\ProgramData\tessonics\tds2\tds-server.json, search for the url paramater inside the server block. By default, this value is set to https://localhost.
You must update it to point to the host running TDS (either the TDS hostname or IP address). We recommend using hostnames and setting up proper DNS entries resolving that host.
If you need to have TDS running on a different port, you must also change the port parameter. Say, your TDS is running on my-tds-host on port 4443, then you will have to set
  "url": "https://my-tds-host:4443"
  "port": 4443,
The alternate port must be present in both the port setting as well as the url setting.
You will need to restart TDS for these changes to take effect. If it's running as a Windows service (default), you can go to the Windows services panel, search for "Tessonics Data Service" and restart it.
Update Desktop Tools
On all computers with Desktop Tools installed, go to File ➜ Data Source ➜ Configure Data Source and replace the IP address in the URL with the hostname or IP configured before.
Now, whenever you want to access TDS on one of these computers, type that same URL in a browser. You may get a privacy warning which can be disregarded. To learn how to remove this warning, see SSL Certification
Update the RSWA Units
You can consult this section to connect the device to TDS, then read this section to transfer the data from Desktop Tools to the RSWA units (either the F1 or F2 units). Once that is completed, the RSWA units will automatically connect to the server.