Tablet
The F2 Tablet is a fully functional computer equipped with an additional electronics module that is attached to the ultrasonic probe.
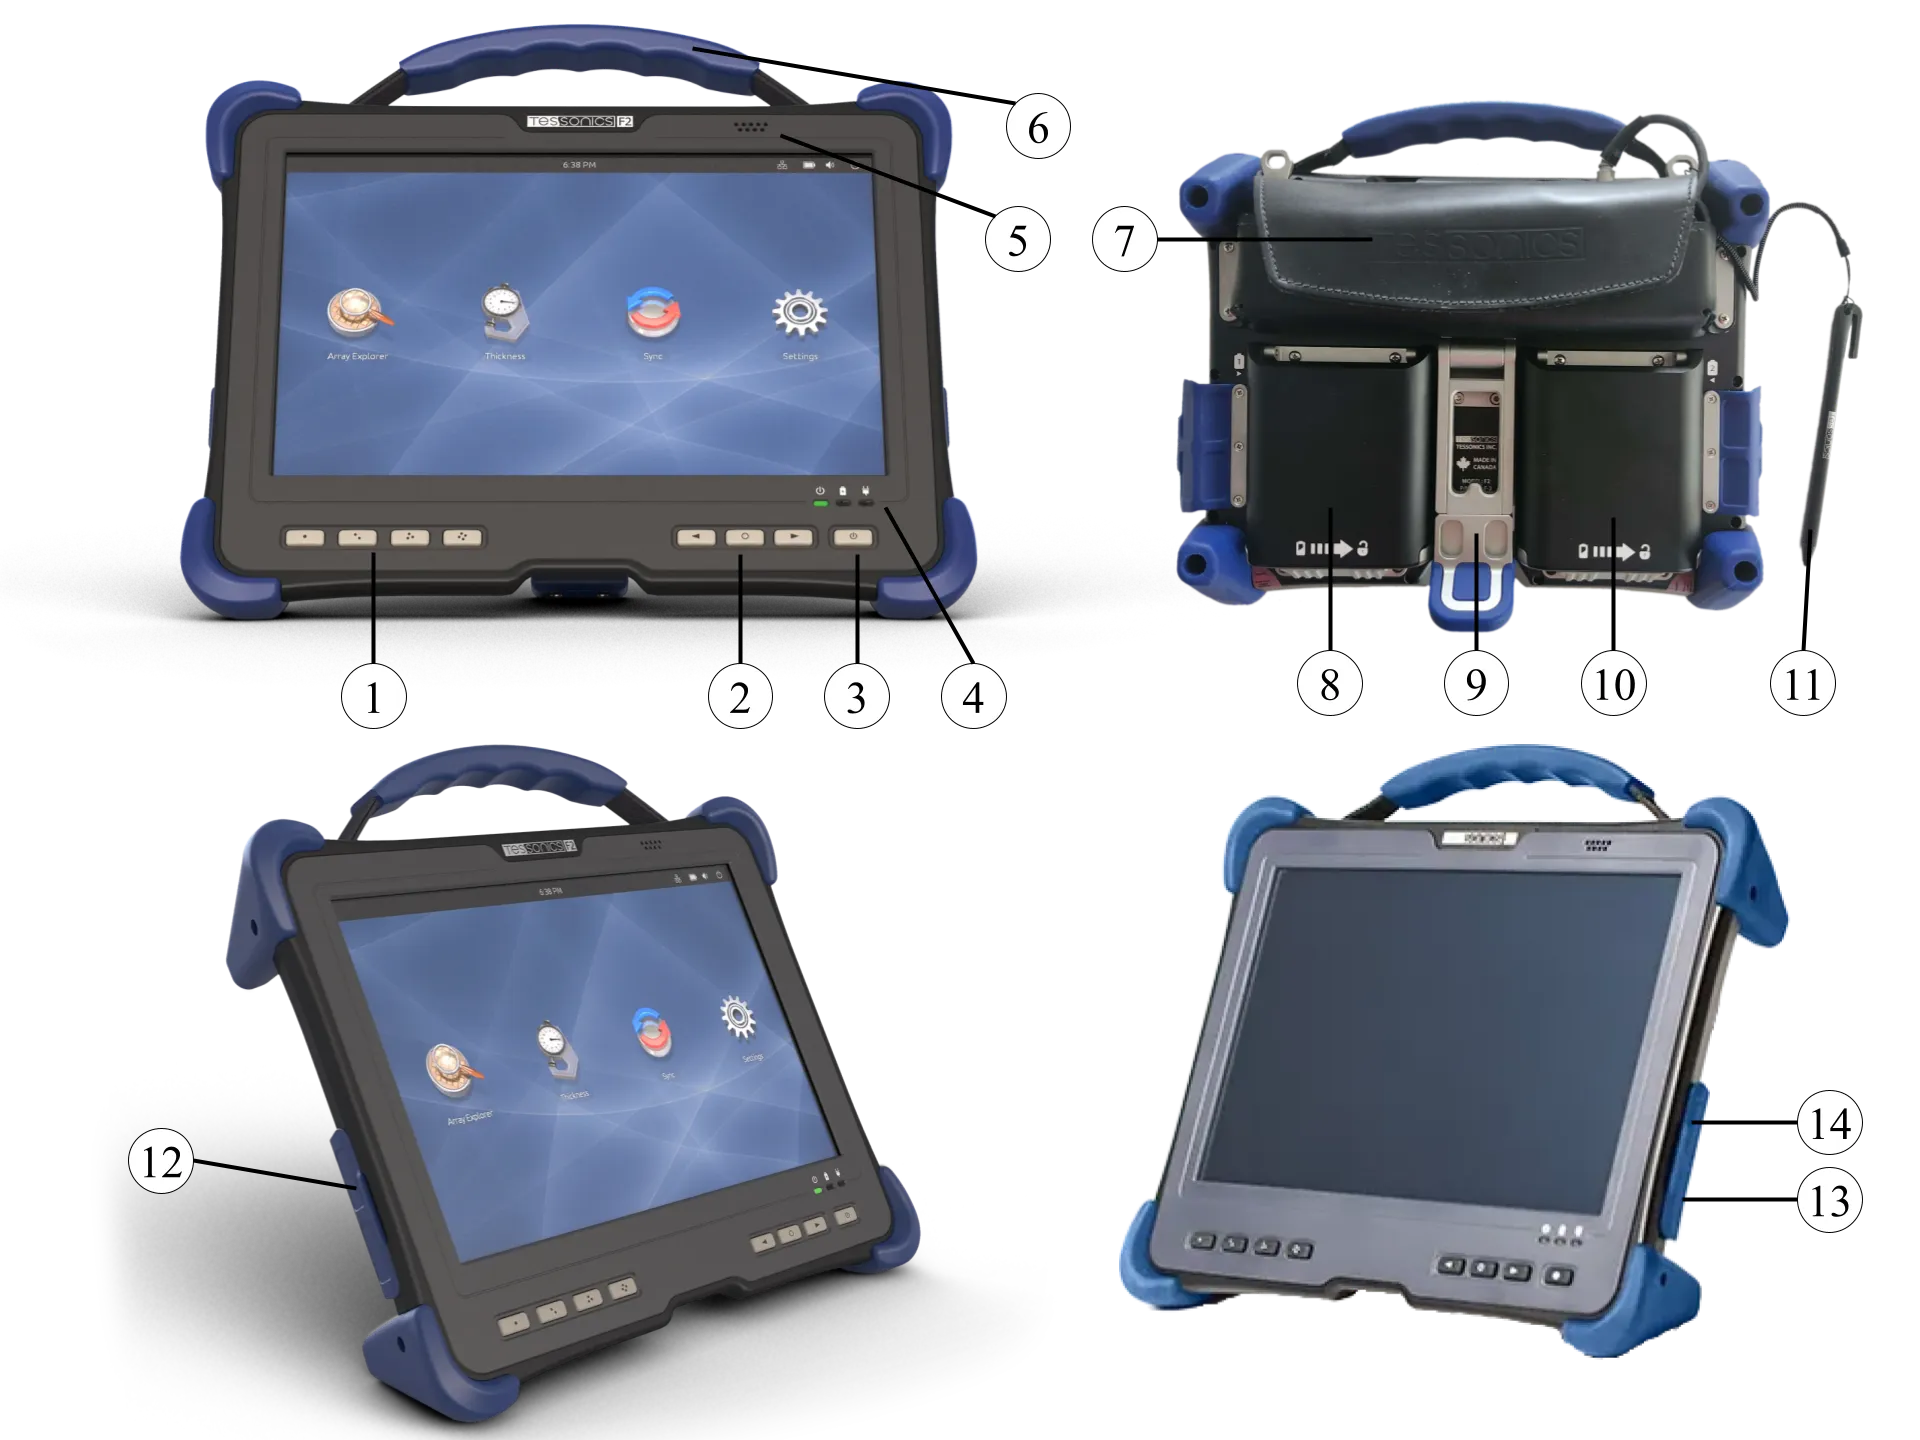
- Inspection buttons
- Volume/brightness buttons
- Power button
- Status indicators
- Speaker
- Handle
- Probe pouch
- First battery
- Stand
- Second battery
- Stylus
- USB x2
- DC-In port
- HDMI port
Status Indicators
Status indicators show the status of system functions such as system power and internal battery charge level.
| Name | LED State | Remarks |
|---|---|---|
| Power | Green | Power is on and the battery is in use |
| Flashing green | Power is in suspend mode | |
| Battery | Off | Battery fully charged |
| Orange | Battery charging | |
| Flashing red | Battery power critically low | |
| Plug-In | Blue | Unit is plugged in, receiving power |
Table: System status indicators
System States
On Mode The system is running and the display screen is on.
Idle Mode Some system functions are regulated or turned off to conserve power. The display screen may be turned off. The system returns to the On state when pen activity or other input is detected.
Suspend-to-RAM Mode System operation is suspended. Most system functions are turned off to conserve power. Power to memory is on, maintaining data in programs that were running before system operation was suspended. The system does not respond to the pen or other input when in Suspend-to-RAM mode. Push the power button return back to On state.
Save-to-Disk Mode System operation is suspended. All system functions are turned off to conserve power. Active data in programs that were running before suspending system operation is stored on the hard disk drive. The system does not respond to the pen or other input. Push the power button return back to On state.
Off Mode All system functions are turned off to conserve power. The system does not respond to the pen or other input. The system boots at the next system power-on.
The system consumes the same amount of power whether it is in Save-to-Disk mode or Off mode.
Screen Protector
Using a screen protector will help insure that the screen remains as clear as possible. When installed, the screen protector becomes a durable, replaceable surface that protects the display from abrasion.
The tablet PC is not waterproof. Do not pour liquids on the system or wash it with a wet cloth.
To install a new screen protector:
- If a screen protector is already installed on the display screen, remove it before installing the new screen protector. The screen protector is held onto the display screen surface by a thin strip of adhesive around the edges. A notch in one corner of the screen protector allows you to slide your fingernail under the screen protector for easy removal.
- Clean the display by wiping the screen surface gently using a soft cotton cloth dampened with denatured alcohol. Ensure that all residues have been removed from the screen before applying a new screen protector.
- Remove the protective coating from the adhesive side of the screen protector first. Apply the screen protector to the display screen surface. When doing so, orient the screen protector with the adhesive side of the screen protector facing the display screen and the notched corner of the screen protector toward the lower left corner of the display screen.
- Apply pressure to the screen protector with your finger using a continuous wiping motion along the edges. The adhesive sets completely within 48 hours. To ensure a good seal between the screen protector and the display, do not lift the screen protector from the display once it has been applied.
- Remove the protective plastic cover from the face of the screen protector.
- Clean any residue remaining on the screen protector by wiping gently with a soft cotton cloth dampened with denatured alcohol. Wipe the screen protector with a soft dry cloth to remove any low-tack adhesive.
Storing
Store the equipment in the Off state with a fully charged external battery installed. The external battery always provides power to some system components even when the system is in the Off state. If the system is stored with the external battery removed, these components are powered by the system’s internal battery. The internal battery is not designed for extended use and will discharge in a short period of time; this could result in damage to the internal battery. You can store the equipment in the Off state for about 30 days with a fully charged external battery installed. After this period, the external battery pack should be recharged or replaced with a charged external battery.
Front View Buttons
The hot keys on the front of the unit function as follows:
| Name | Description |
|---|---|
| Power Button | The power button turns system on and goes into standby automatically. Press momentarily to turn on the system or to exit from standby. Press and hold for at least 3-4 seconds to turn off the system. |
| Circular Button | Toggles the volume or brightness control. Press the button to toggle the control, and press again to switch to the other control. Press the left and right buttons to change the volume and brightness level. |
| Inspection Buttons | (See (1) in the image above) These provide tools for inspections, described below. |
| 1-Dot Button | Performs a Setup operation during an inspection. |
| 2-Dot Button | Performs a Get operation during an inspection. |
| 3-Dot Button | Passes the current weld during an inspection. |
| 4-Dot Button | Fails the current weld during an inspection. |
Table: Front view buttons