Remote Control
A remote is supplied with the unit and allows for operation of the device wirelessly. Once the software has been initialized, the remote allows the operator to perform common tasks. When not in use, the remote is stored in a specialized holder on the back on the device.
Depending on the hardware of the F2 device, you may get one of two remotes.
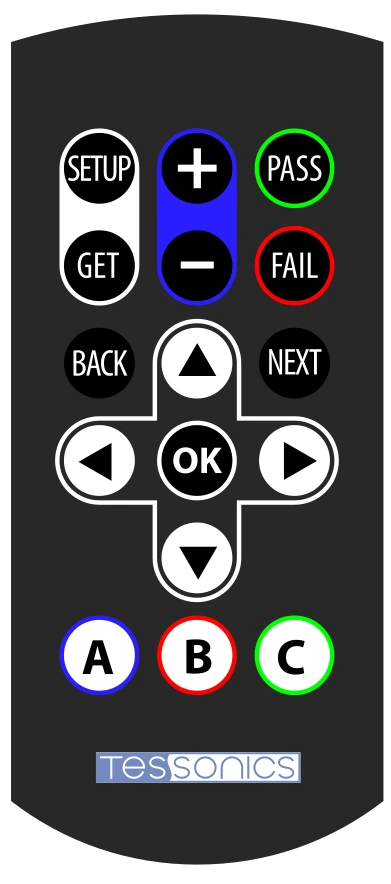
A, B and C buttons are configurable and can be assigned alternative functionality. See here to learn more about this.New Remote
Button Assignments

| Button | Function |
|---|---|
| Perform initial Setup routine. | |
| Perform Get routine for taking a measurement. | |
| Increase/decrease the diameter of the manual circle. | |
| Make a decision on weld quality, either pass or fail respectively. | |
| Move to next weld or bond. | |
| Exit from menu or dialog. | |
| Confirm selection in menus and dialogs. | |
| Up and down cursor keys; in Array Explorer’s main window: Navigate up and down in the weld list view. | |
| Left and right cursor keys; in Array Explorer’s main window: Navigate left and right in recent measurements. | |
| Opens drop down menu in A-scan view. | |
| Toggles between front and back side measurement on three plate joints. | |
| Toggles between automatic and manual circle measurements. |
Pairing
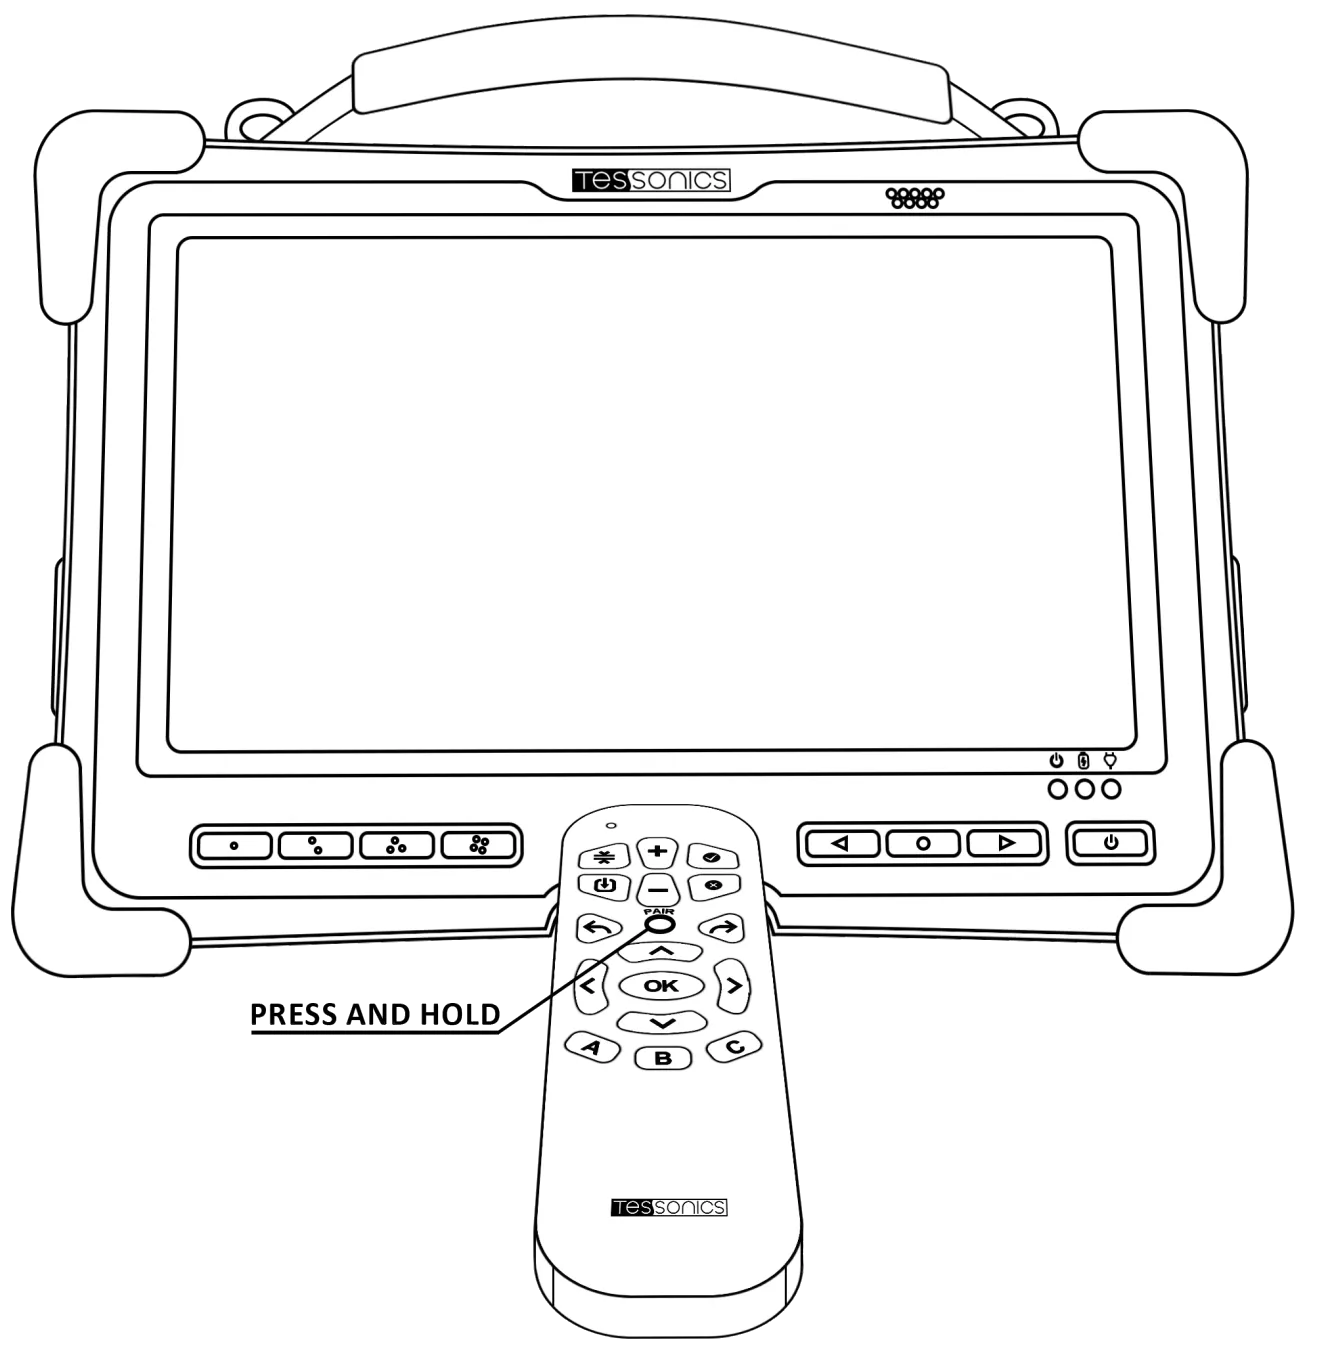
To pair the remote to your specific F2 unit, follow these instructions:
- Power on the F2.
- Position the remote against the front bezel of the unit, ensuring the remote is making direct contact with the bezel (displayed in the image below).
- Press and hold the PAIR button for about 5 seconds until the indicator light on the remote begins flashing.
- The light will flash green and then stop when the remote is finally paired with the F2.
Unpairing
To unpair a remote, follow these instructions:
- Press and hold the PAIR button for about 3 seconds until the red LED light turns on.
- The light will flash red a couple times, then turn off.
- Once the light is turned off, the remote is now unpaired from the F2. You can follow the pairing instructions to repair it with your F2 device.
Specifications
| Model | R05-F-2-REMOTE |
| Description | Tessonics Receiver. |
| Applicant | Celadon Inc. |
| Communication with RSWA | Through 12505WR-05 connector. |
| Size | 18.0 x 28.0 (mm), 1.6T. |
| Operating temperature | 0 ºC - 50 ºC. |
| Rated input | DC 3V (2 * AAA batteries). |
| Low voltage threshold | 2.3V. |
| Microcontroller minimum voltage | 1.8V. |
Regulatory Compliance
FCC ID: YI5-R05F2REC (for the receiver) and YI5-R05F2REM (for the remote).
Industry Canada ID: 9065A-R05F2REC.
FCC Compliance Statement
This device complies with part 15 of the FCC rules. Operation is subject to the following two conditions: (1) This device may not cause harmful interference, and (2) this device must accept any interference received, including interference that may cause undesired operation.
FCC Interference Statement
This equipment has been tested and found to comply with the limits for a Class A digital device, pursuant to part 15 of the FCC Rules. These limits are designed to provide reasonable protection against harmful interference when the equipment is operated in a commercial environment. This equipment generates, uses, and can radiate radio frequency energy and, if not installed and used in accordance with the instruction manual, may cause harmful interference to radio communications. Operation of this equipment in a residential area is likely to cause harmful interference in which case the user will be required to correct the interference at his own expense.
Information on Test Modes and Additional Testing Requirements
a) The modular transmitter has been fully tested by the module grantee on the required number of channels, modulation types, and modes, it should not be necessary for the host installer to re-test all the available transmitter modes or settings. It is recommended that the host product manufacturer installing the modular transmitter, perform some investigative measurements to confirm that the resulting composite system does not exceed the spurious emissions limits or band edge limits (e.g., where a different antenna may be causing additional emissions).
b) The testing should check for emissions that may occur due to the intermixing of emissions with the other transmitter, digital circuitry, or due to the physical properties of the host product(enclosure). This investigation is especially important when integrating multiple modular transmitters where the certification is based on testing each of them in a stand-alone configuration. It is important to note that host product manufacturers should not assume that because the modular transmitter is certified that they do not have any responsibility for final product compliance.
c) If the investigation indicates a compliance concern the host product manufacturer is obligated to mitigate the issue. Host products using a modular transmitter are subject to all the applicable individual technical rules as well as to the general conditions of operation in Sections 15.5,15.15, and 15.29 to not cause interference. The operator of the host product will be obligated to stop operating the device until the interference has been corrected.
Additional Testing, Part 15 Subpart B Disclaimer
The final host/module combination need to be evaluated against the FCC Part 15B criteria for unintentional radiators in order to be properly authorized for operation as a Part 15 digital device. The host integrator installing this module into their product must ensure that the final composite product complies with the FCC requirements by a technical assessment or evaluation to the FCC rules, including the transmitter operation and should refer to guidance in KDB 996369. This appliance and its antenna must not be co-located or operation in conjunction with any other antenna or transmitter.
- OEM integrators must ensure that its product is electrically identical to the device, FCC ID: FCC ID : YI5-R05F2REC reference designs. Any modifications to module reference designs may invalidate regulatory approvals in relation to the product, or may necessitate notifications to the relevant regulatory authorities.
- OEM integrators are responsible for regression testing to accommodate changes to designs, new antennas, and host and submit for C2PC filings.
- Colocation with other transmitter modules will be addressed through filings for those co-located transmitters when necessary or that colocation of other transmitters will be according to applicable KDB guidelines including those for RF exposure.
- Appropriate labels must be affixed to the product that complies with applicable regulations in all respects. The regulatory label on the final system must include the statement: "Contains FCC ID: YI5-R05F2REC".
FCC Caution
Any changes or modifications to the equipment not expressly approved by the party responsible for compliance could void your authority to operate the equipment. This transmitter must not be colocated or operating in conjunction with any other antenna or transmitter.
Industry Canada Statement
This device complies with Industry Canada license-exempt RSS standard(s). Operation is subject to the following two conditions: (1) this device may not cause interference, and (2) this device must accept any interference, including interference that may cause undesired operation of the device.
"This Class (A) digital apparatus complies with Canadian ICES-003."
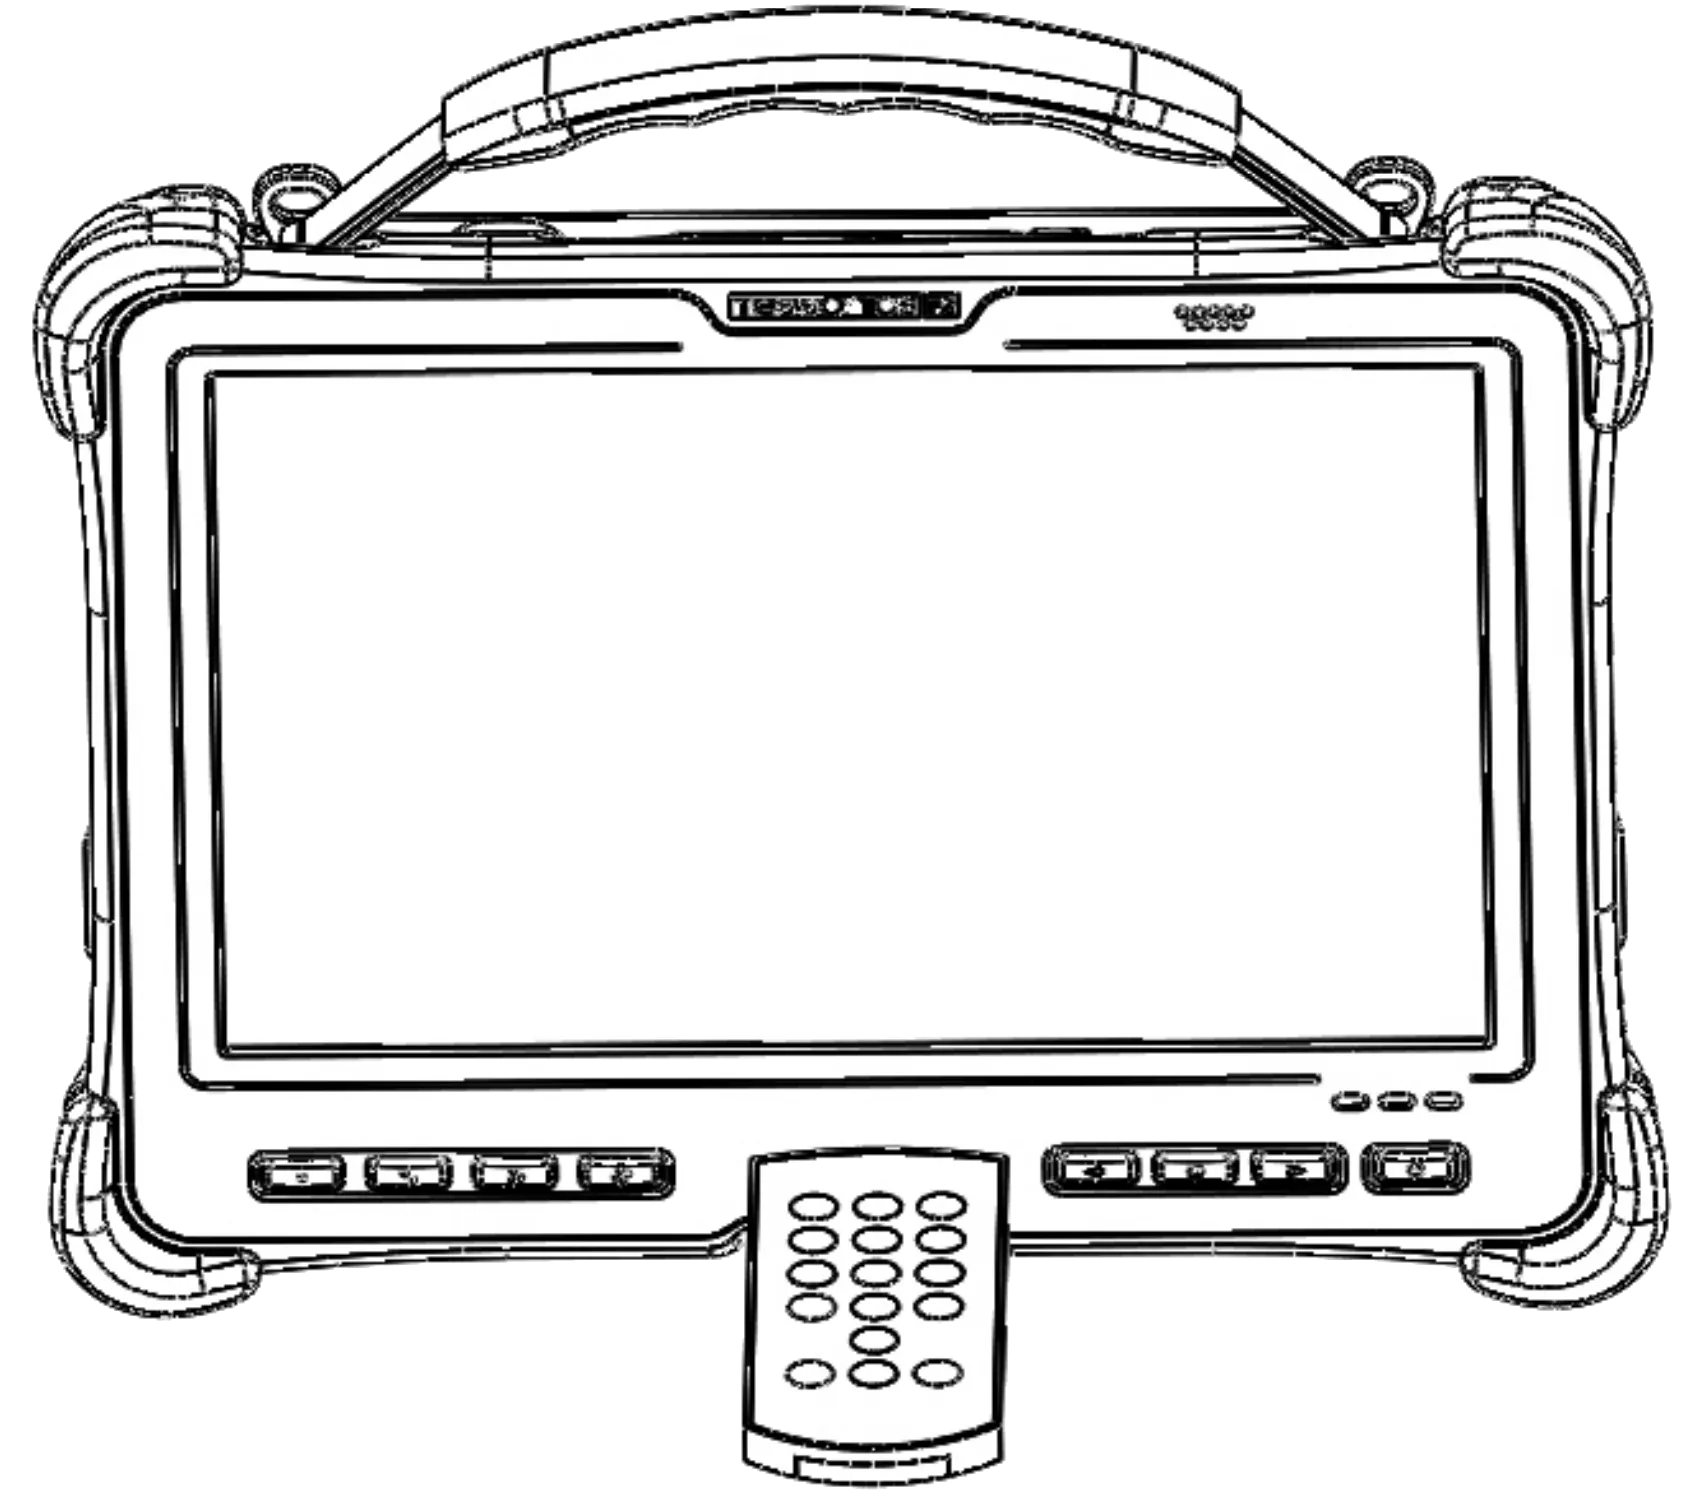
Old Style Remote
Button Assignments
| Remote | Function |
|---|---|
| Perform Setup or Get routine for taking a measurement. | |
| Increase/decrease the diameter of the manual circle. | |
| Make a decision on weld quality. | |
| Move to next weld or unit. | |
| Exit from menu or dialog. | |
| Confirm selection in menus and dialogs. | |
| Up and down cursor keys; in Array Explorer’s main window: Navigate up and down in the weld list view. | |
| Left and right cursor keys; in Array Explorer’s main window: Navigate left and right in recent measurements. | |
| Opens drop down menu in A-scan view. | |
| Toggles between front and back cells in weld list view. | |
| Toggles between automatic and manual circle measurements. |
Pairing
To pair the remote to your specific F2 unit, follow these instructions:
- Power off the F2 and remove both batteries for at least 10 seconds.
- Remove the battery from the back of the remote for 10 minutes.
- After the 10 seconds has passed, reinsert the batteries back into the F2.
- Power on the F2 and open Array Explorer.
- After 10 minutes has passed, reinsert the remote battery.
- Press
 on the remote for about 5 seconds while holding it in front of the F2 (as shown in the image below).
 - The remote should now be paired with the F2.