Image Editor
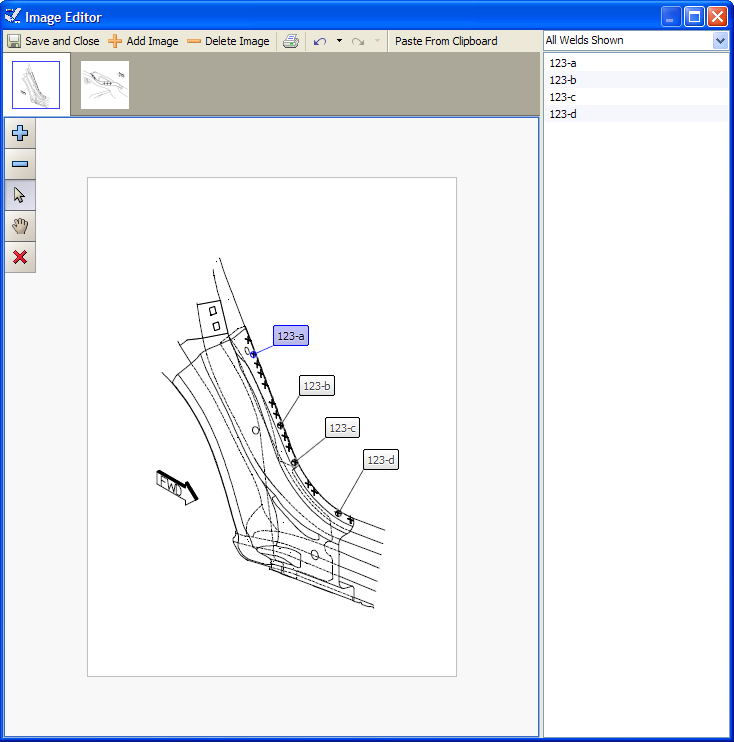
The Image Editor is used to manage and edit the images associated with the currently selected Part. Using this editor allows you to add images to a part and place weld markers on each image. A screenshot of the Image Editor is shown below:

Toolbar
-
Save and Close: Save all changes made and exits the Image Editor. (This only saves changes made inside the Image Editor. You still need to select “Save” from the main menu in order to save all changes to disk).
-
Add Image: Clicking this brings up the usual “Open File” pop-up most windows users are familiar with. Simply choose the image that you want to add and press OK.
-
Delete Image: Clicking this deletes the currently selected image. (It is only truly gone if you save and close the Image Editor and then save from the Designer main menu).
-
Print: Click this button to print out the Image and the weld markers that are placed on it.
-
Weld List Filter: Clicking and selecting an option from this filter will only show welds that meet the filters conditions. This is meant to trim down the possibly long list of welds, and to help point out welds that might be missing or missing a marker on an image.
-
Undo: Undo the last change you made.
-
Redo: Redo the last change (revert the pervious Undo operation).
Image Selector
This horizontal bar shows all of the images associated with the currently selected Part, and shows which image is currently being shown. If the number of images to choose from is large, two buttons appear that let you scroll horizontally through the list of images to find the one you are looking for.
Weld List
Shows a list of welds that can be placed on an image. Clicking on a weld that is already assigned to the currently displayed image will highlight that weld on the image. To add a weld to an image, just drag and drop the desired weld onto the image. A weld cannot appear in the same image twice; trying to add a second marker for a weld for the same image results in the first marker being erased.
Image Display
This large section shows what will be displayed on the RSWA screen. It shows the currently selected image and all of the markers that are placed on this image.
The buttons in the upper left corner of the image display provide the following functions:
- Zoom in.
- Zoom out.
- Switch to Selection mode.
- Switch to Pan mode.
- Delete selected markers.
To move a marker and its tag, simply click on the marker or tag and drag it around the image. Clicking on a marker will also highlight the markers weld in the weld list automatically