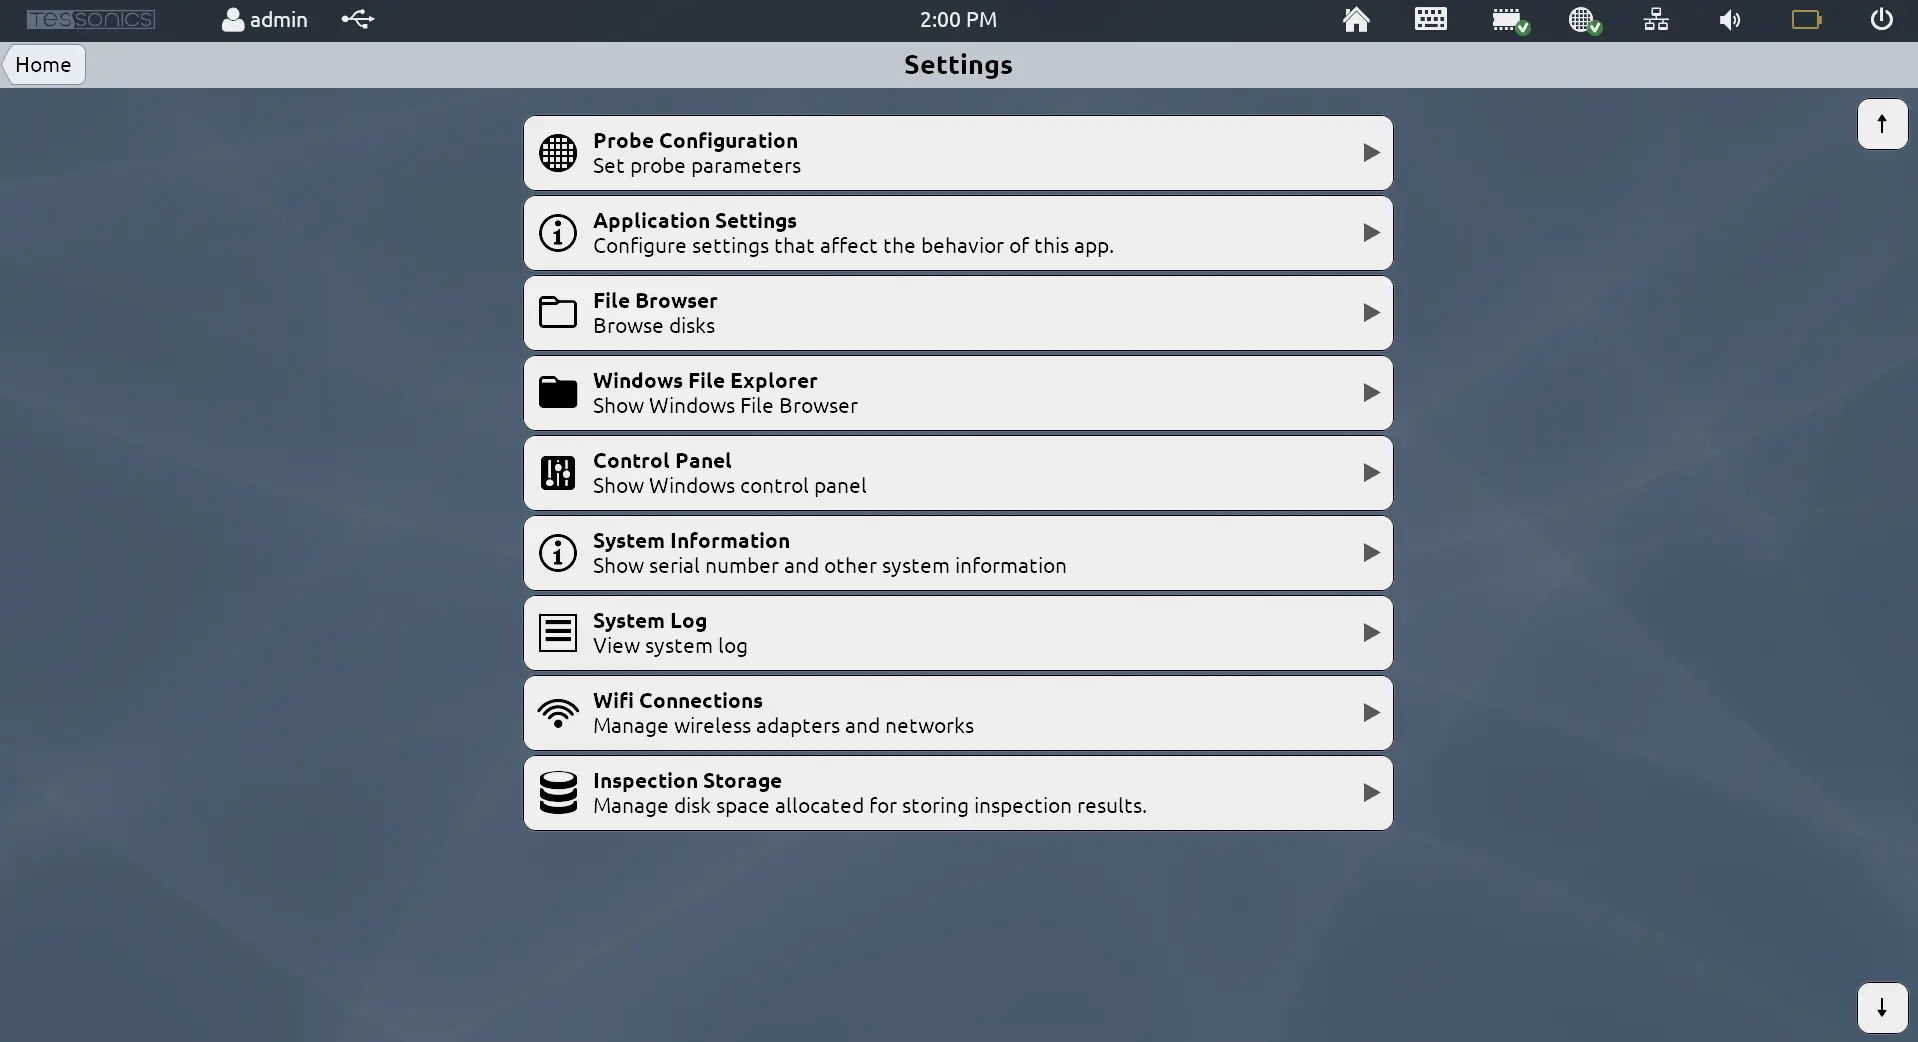
Settings

The Settings application provides access to settings, system information, and more.

Settings

Probe Configuration

Configure your ultrasonic probe. This page allows you to adjust settings related to your ultrasonic probe. In most cases, the Auto Setup action should be sufficient for operating your RSWA.

Probe Configuration

Application Settings

This allows you to configure different settings for exporting. The main settings are:

VersionSettingBehavior

v4.2.0

Sort reasons alphabeticallyThe reasons as displayed when (long-)clicking on pass/fail are sorted in the order chosen in Desktop Tools or in alphabetical order. Activating this, will use alphabetical order.

v4.3.0

Allow Custom ReasonsWhen (long-)clicking on pass/fail, this setting will include an option to assign a custom-text reason to the decision.

v4.8.0

Stay on same side across weldsDuring inspection, when moving from one weld to the next, Array Explorer will default to select the first measurement slot. Activating this setting, will keep the selected slot active when going to the next spot. This enables the operator to first check all spots from one side and then the other without having to move to the second slot for every weld.

v4.4.0

Default to 3T modeBy default Array Explorer will switch to 3T mode, if the template data contains stack information for a middle plate. Deactivating this option will always activate 2T mode unless a middle plate thickness is applied manually.

v4.6.0

Default to continuous measurementsDuring inspection, the GET button is replaced with GET live to start a continuous mode measurement by default. Otherwise, the continuous mode is started by long-pressing GET.

v4.3.0

Display Relative IndentationWhen performing a measurement, the resulting indentation is displayed releative to the front plate thickness.

v4.4.0

Keep Zoom Level when changing imagesWhen active during inspection, changes to the image zoom level will be applied to any other image when switching to spots on a different image. Otherwise, the zoom level will reset on image change.

v4.7.0

Keep setup value across measurementsThis is a mode, comparable to v3 (F1) behavior. When active, Array Explorer will not require a new setup measurement when the stack changes. Instead it will continue to reuse the given setup info regardless of stack changes.

v4.0.0

Export Inspections on SaveAfter saving an inspection, this setting decides whether or not to automatically export them to the TDS server.

v4.3.0

Allow Inspection of untracked SpotsWhen active, clicking on a hotspot not included in the active route (marked with an X on the image), will provide options to insert that spot into the active inspection.

v4.5.0

Only allow creator to continue inspectionWhen active, only the user that originally started an inspection is allowed to resume it. Users may open inspections by other users but in read-only mode.

v4.0.0

24-Hour TimeSet whether the time display shows 24h-format or AM/PM format

Programmable Remote Buttons

v4.7.0

introduced the feature to configure the A, B and C buttons of the remote. Each of these buttons may be assigned one of the following behaviours.

OptionBehavior
SetupTrigger a Setup
GetAcquire a measurement
Get LiveStart continuous measurement mode
PassMark the active spot as passed
FailMark the active spot as failed
Change Middle ThicknessOpen the menu to select a middle-plate thickness
Change C-Scan Color PaletteSwitches to the next color in the list of color palettes available for C-scans
Select first location with no decisionSwitch selection to the first spot from the spotlist that hasn't been given a decision yet

File Browser

Provides access to the file system on the RSWA as if it were a standard PC.

note

You must be logged in as an admin account to view this setting.

You can select different folders and files using the Select button at the top right of the screen, where you have the following options:

  • Create New Folder
  • Show Hidden Folders
  • Delete the selected files and folders
  • Cut and Copy the selected files and folders
  • Paste

You can also execute .exe files. That is actually how you update the RSWA unit! Simply download the new executable onto a USB device, navigate to that device using the File Browser, select the file and hit Execute.

File Browser

Windows File Explorer

This will open up the Windows File Explorer. This is useful for more specific features such as taking screenshots and saving to the device.

  • As an example use case: take a screenshot of the RSWA by plugging in a standard keyboard and hitting PrtSc. Then go to the Windows File Explorer, create a new bitmap file (same as you would on Windows) then open it. Then paste the screenshot there and save it as an image file.
    After this, you can save the image to a flash drive in the File Explorer.
note

You must be logged in as an admin account to view this setting.

Date and Time

This is where you can set the date, time and timezone.

note

You must be logged in as an admin account to view this setting.

warning

For all of these settings, you must click Apply in order for the changes to come in effect. If you click the Date And Time arrow at the top left, it will go back without saving.

Date and Time

Set Date

Under the Set Date menu, you can scroll through available days of the week, month and year like a standard calendar. Click and drag with a mouse, or touch and drag with a stylus pen or your finger to scroll through the available options. When you're done, click Apply at the top right of the screen.

Set Date

Set Time

Under the Set Time menu, you can go through a similar process as setting the date to set the exact time. You also have an option to change to a 24-hour system. Click Apply when done to save your changes.

Set Date

Set Timezone

Under the Set Timezone menu, you can go through a similar process as setting the date and timezone. You also have an option to adjust to Daylight Saving Time or not. Click Apply when done to save your changes.

Set Date

Control Panel

Provides access to the Windows Control Panel. There you can make additional modifications such as enabling remote desktop support, same as you would on any Windows 10 computer.

note

You must be logged in as an admin or advanced account to view this setting.

Control Panel

System Information

Show information related to your RSWA, including the software version, licensing information, and hardware information.

System Information

License Details

License details includes the customer name registered on the device, the device's ID and the amount of spot welds (steel and aluminum), adhesive bonds (steel and aluminum) and correlation exports the device is registered to accomplish.

License Details

System Details

System details include information about the hardware and software currently running on the system, including the hardware, operating system, network, software versions and system paths.

System Details

System Log

Provides access to the RSWA activity log, including the performing of inspections, licensing updates, importing and exporting data, and other general system errors and warnings.

You have options to clear the logs, filter them by labels and to export them to a USB drive.

System Log

Wifi Connections

Adjust wifi settings so that the RSWA can transfer data wirelessly. This is where you can connect, disconnect and forget about different networks. Clicking on Edit also allows you to order the priority of different networks by moving certain networks up or down the list.

note

You must be logged in as an admin or advanced account to view this setting.

Wifi Configuration

Inspection Storage

This page provides you with a summary of your device's storage, and allows you to view and delete old inspections to free up hard drive space on the RSWA.

Inspection Storage