Data Source Wizard
All of the data (parts, users, measurements, etc..) that is used by or collected from the RSWAs is stored on the desktop computer where the Synchronizer, Template Designer, etc. is installed. It is possible to tell the software to store and retrieve data from a different location like a shared network drive. Storing the data on a shared network drive has two major benefits:
- Network drives are usually backed up on a regular basis; and
- Data can be shared by all who need it.
There are two reasons you would use the data source wizard:
- Move existing data to a shared location (i.e. make it available to everyone); and
- Point software to a shared location that already has data.
It is important to know which action you are going perform before using the wizard.
Opening the Data Source Wizard
Changing the data source is an important operation and care should be taken when switching data sources. Because it is an important procedure, you must be logged in as Admin in order to use it. When you log in as Admin, a new toolbar options will be available. To open the Data Source Wizard, select Data -> Setup Data Source.
Moving Existing Data to a Shared Location
The goal here is to make the data stored on a desktop accessible to others by moving it to a shared location.

- Make a new folder on the drive.
- Open the data source setup wizard.
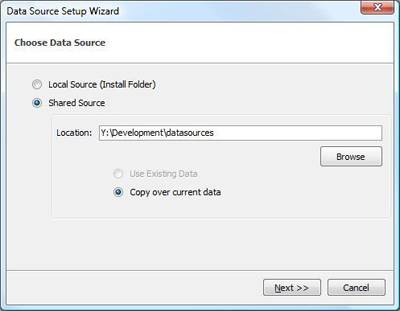
- Select Shared Source and browse to the new folder.
- You may get an error message indicating some file are missing; this is normal.
- Double check that the option Copy over current data is selected, then click Next >>.
- Uncheck Make Full Backup of current Data, then click Next >>.
- Data will not be deleted from your hard drive.
- Read the summary, then click Finish.
Once the data is copied over, the designer will restart. Afterwards, everything should look the same except now all changes will be saved to the new data source.
Pointing Software to a Shared Location That Already Has Data
The goal here is to tell the software to work with the data that is saved on the shared network drive.

- Figure out where the data is saved.
- Open the data source setup wizard.
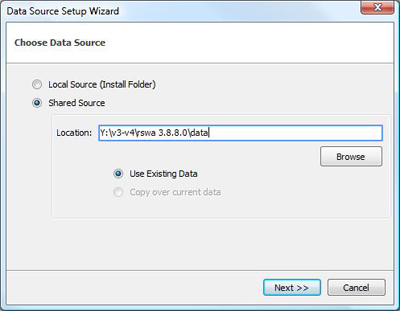
- Select Shared Source and browse to the folder.
- You should not get any error messages.
- Double check that the option Use Existing Data is selected, then click Next.
- Uncheck Make Full Backup of current Data, then click Next.
- Data will not be deleted from your hard drive.
- Read the summary, then click Finish.
The software will restart. After it restarts, you should have access to the data that is on the shared drive.