Custom Inspection Mode
The custom inspection type allows you to measure welds and assign names to these welds as you check them. A screenshot of a custom inspection can be seen in the figure below.

Weld name - Shows the welds name. The default names are numbered welds starting from one. Welds can be renamed individually by holding your finger on the weld until the pop-up menu appears (approximately 2 seconds) and then selecting Rename. There is also an advanced Auto-Generator feature (see Weld Name Auto-Generator for more information).
Measurement thumbnails - Each of these thumbnails represents a welds measurement. Clicking on a thumbnail brings the measurement back into the C-Scan for review, along with the history of measurements taken for that weld. This history list can be used to choose which measurement appears in the thumbnail; only the chosen measurement will be saved. There are two thumbnails because 3T stacks are supposed to be measured from both sides, and these measurements should be paired together.
Decisions - Each weld can have an associated pass or fail. Shown is either a check mark for pass, a cross for fail, or a dotted circle meaning no decision yet.
Reasons - Shows the reason chosen for failing a weld. Can also show the reason for passing a weld without measurement. During an inspection, the Pass, Fail, and Next Unit buttons appear enabled in the middle of the button bar.
The list of reasons for passing or failing a weld are programmed into the RSWA and cannot be changed by users. To change a weld's pass or fail reason, simply hold your finger on the weld until a pop-up menu appears (for approximately 2 seconds) and select Clear Decision. You can now re-pass or re-fail the weld and select your new decision.
Starting New Custom Inspection
Custom Inspection can be started by clicking the New Inspection button in the top left corner of the screen. On the screen that pops up, choose Custom and press Next. You will be prompted to enter a name for the inspection. Entering a name is optional but doing so will make it easier to retrieve your inspection in the future. Now the New Inspection button changes to the End Inspection button.
If no parts have been defined yet, pressing New Inspection automatically chooses Custom and prompts for a name of the inspection.
Ending and Saving Custom Inspection
Clicking the End Inspection button or trying to close Array Explorer will ask you if you would like to save the inspection. If you choose to save the inspection, Array Explorer will do so without any further input from the user ( i.e. you do not have to provide a filename or select a place to save the inspection).
Once an inspection is saved, welds with decisions cannot be modified.
Renaming Welds
Push and hold a weld in the weld list. From the pop-up menu, select Rename. Type in the new weld name then push OK.
Weld Name Auto-Generator
If your weld names are similar, you can instruct the RSWA to name your welds for you using the Weld Name Auto-Generator.
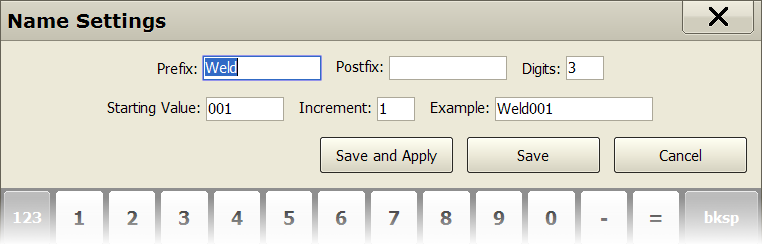
Push and hold a weld in the weld list. Choose Name Settings from the pop-up menu. Doing so will launch the window shown above. This window allows you to customize the prefix, postfix, number of digits, starting value, and increment. It also provides and example of what the resulting name will look like. To save the changes, click either the Save or Save and Apply button. Clicking Save will apply the changes to all future welds, and clicking Save and Apply will apply the changes to all existing and future welds.