Part Inspection Mode
The part inspection type is an advanced inspection type that uses coordinator defined factory information. All of the factory information is stored in a desktop PC and distributed to the RSWA. RSWA units then use this information to guide and organize an inspection, letting the inspector focus on inspecting welds. All of the factory data is created using the Template Designer application, and then imported into an RSWA via the RSWA Synchronizer program.
A screenshot of the information area in part inspection mode can be seen in the picture below.

Similar to a custom inspection, you can check welds and pass or fail them as you go along. Unlike a custom inspection, you follow a predetermined list of welds that an administrator has created for you. They are already named and ordered, and all that needs to be done is to inspect the welds.
List of Images
A part can have one or more images that show the part in different views. Front side, back side, etc. This list shows all the images that belong to the part being inspected. You can choose which image is shown by clicking on the image thumbnail.
Image Area
Shows the current image and the welds that are on it. The currently selected weld that is being measured is shown highlighted to help an inspector find the weld to be measured. The buttons in the image area are explained in the following table:
| Button | Description |
|---|---|
| Zoom in and out the image, centered on the currently selected weld. | |
| Toggle between showing all the welds or only the currently selected weld. | |
| Toggle between a regular size and full screen image display. |
Weld List
This part shows the list of welds that are to be measured for this part. An operator can check the welds in any order they like by selecting the weld they want to check from the list.
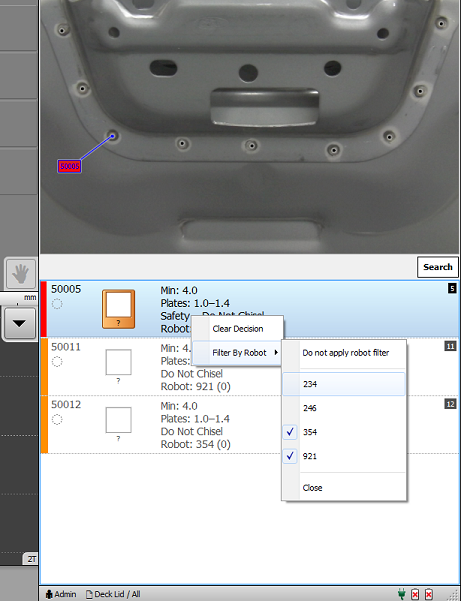
If the part has robot information, the list can be filtered to only show welds from specific robots by clicking and holding down on the weld list. See the picture below.

Just like in a Custom Inspection, a Part Inspection allows using Pass/Fail buttons to pass or fail the current weld. Instead of a New Weld button however, a Next Unit button is provided. This lets you move to the next Inspection Order or repeat the same Inspection Order.
Starting New Part Inspection
In the main Array Explorer window, click the New Inspection button. In the window that pops up, select Part and press Next. A list of parts that have been programmed into the RSWA is shown. Choose the part to inspect and press Next. The next window asks to name the Inspection. You can enter the part name (or leave it blank) and press Next. If there are any Inspection Orders defined for this part, a final window pops up showing a list of inspection orders to choose from. Select one and press Finish. The window closes and you can start checking welds.
If no inspection orders have been defined, the RSWA simply shows all welds on the selected part in alphabetical order.
Ending and Saving Part Inspection
Pressing the End Inspection button anytime during a Part Inspection will save your inspection to the RSWA unit.