Set Up TDS
TDS as a Central Server
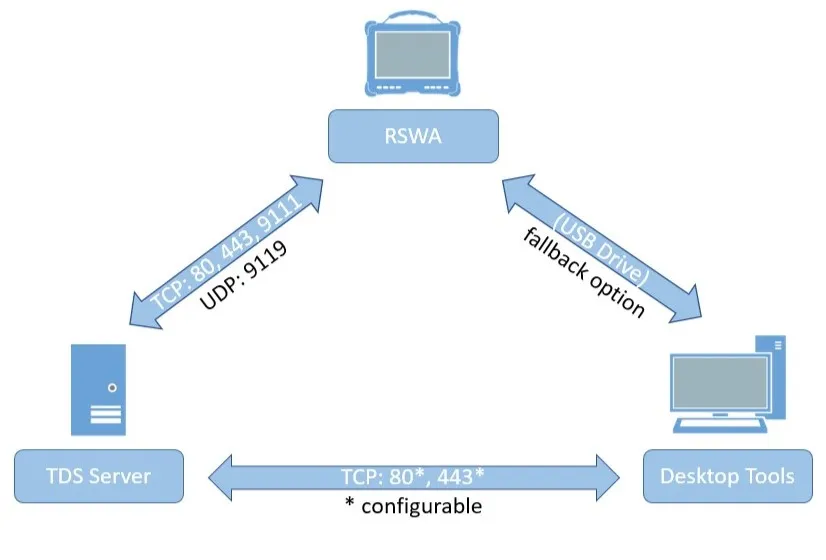
It is common to have a central server with all relevant inspections, parts, groups and users, shared across all computers and RSWA units. This document provides a step-by-step guide on how to configure this for any work environment.

Running the Server as a Windows Service
In most cases, it is advisable to run the TDS server as a Windows Service. This means the server will automatically start when the PC starts and can run without having a user logged in. This is the default case for current installations and will be setup by the installer automatically. To configure this manually, read on.
This has been made an optional feature for versions 4.8.0 of TDS and newer.
To register it as a service, you will need to open a Windows Command Prompt. This will require administrative privileges.
- Click on the Windows Start button, then type
cmdto search for the Windows Command Prompt. Right click on the application and select the option Run as Administrator. - Navigate to the installation folder of TDS -
C:\Program Files\Tessonics\TDS2by default. To do that, type:cd "C:\Program Files\Tessonics\TDS2"and hit Enter. - Run the command
./tds-server.exe service-installand hit Enter. - Close the Windows Command Prompt window.
After that, the TDS server can be controlled through the Windows Service Manager.
Click on the Start button, and type service, then select the Services app. The
TDS Server will be in the list of services, under the name "Tessonics Data Service".
Initial TDS Configuration
The TDS installer places a tds-server.json inside C:\ProgramData\tessonics\tds2. This JSON-encoded configuration file contains multiple sections with key-value configuration options.
The file is inside ProgramData, not "Program Files" or "Program Files (x86)". The ProgramData folder is by default hidden in Windows and requires Administrator privileges to access.
With v4.8.0 and higher, the installer will query basic required configuration such as hostname and port. If these have been setup correctly,
it is not necessary to touch the settings file to get TDS up and running.
For older TDS versions, after the installation, at least the url parameter must be set correctly to have TDS redirect to the right hostname.
In the file C:\ProgramData\tessonics\tds2\tds-server.json, search for the url paramater inside the server block. By default, this value is set to https://localhost.
You must update it to point to the host running TDS (either the TDS hostname or IP address). We recommend using hostnames and setting up proper DNS entries resolving that host.
If you need to have TDS running on a different port, you must also change the port parameter. Say, your TDS is running on my-tds-host on port 4443, then you will have to set
  "url": "https://my-tds-host:4443"
  "port": 4443,
The alternate port must be present in both the port setting as well as the url setting.
You will need to restart TDS for these changes to take effect. If it's running as a Windows service (default), you can go to the Windows services panel, search for "Tessonics Data Service" and restart it.
Update Desktop Tools
On all computers with Desktop Tools installed, go to File ➜ Data Source ➜ Configure Data Source and replace the IP address in the URL with the hostname or IP configured before.
Now, whenever you want to access TDS on one of these computers, type that same URL in a browser. You may get a privacy warning which can be disregarded. To learn how to remove this warning, see SSL Certification
Update the RSWA Units
You can consult this section to connect the device to TDS, then read this section to transfer the data from Desktop Tools to the RSWA units (either the F1 or F2 units). Once that is completed, the RSWA units will automatically connect to the server.