Device Manager
The Device Manager allows you to connect to various RSWA devices on your network.
- 4.9.0 and Newer
- 4.8.0
- 4.7.1 and Earlier
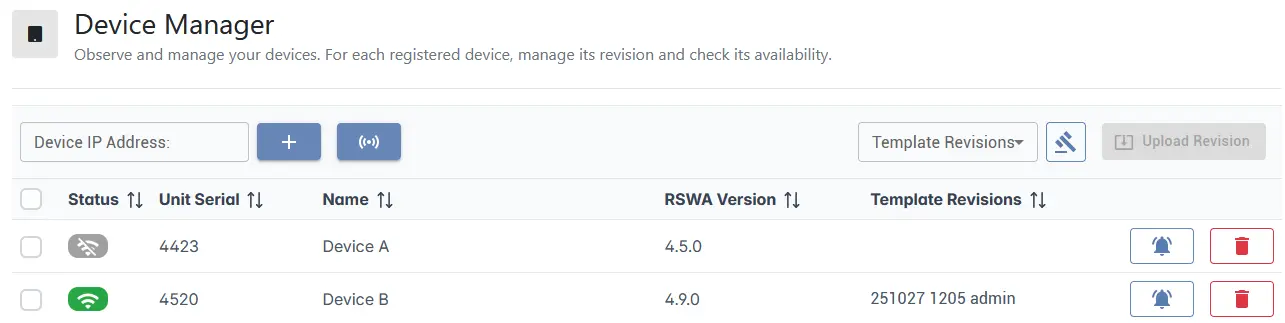
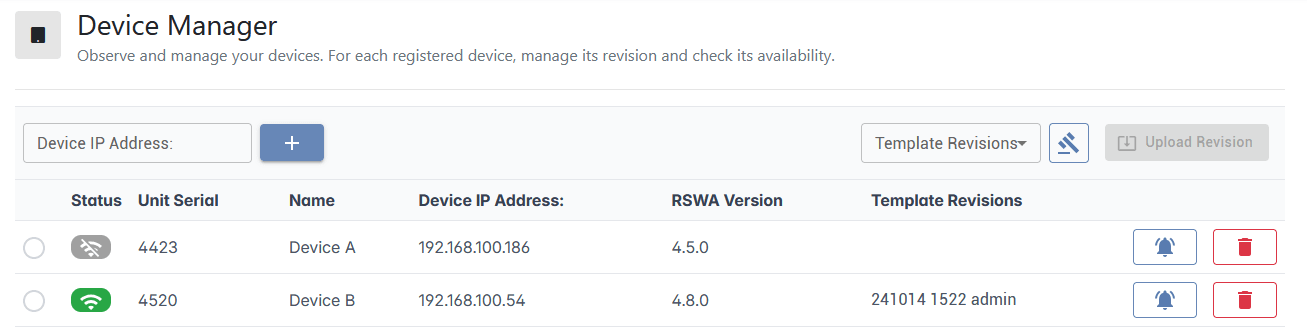
The devices are listed in the main center table, displaying the device's serial number, name, RSWA version, and the current Template Revisions. A green Wi-Fi icon indicates the unit is connected to TDS, while a grey Wi-Fi icon indicates the device is disconnected.
With the icons on the right side, you can Ring the device to easily identify it on the field, or remove it from the TDS.
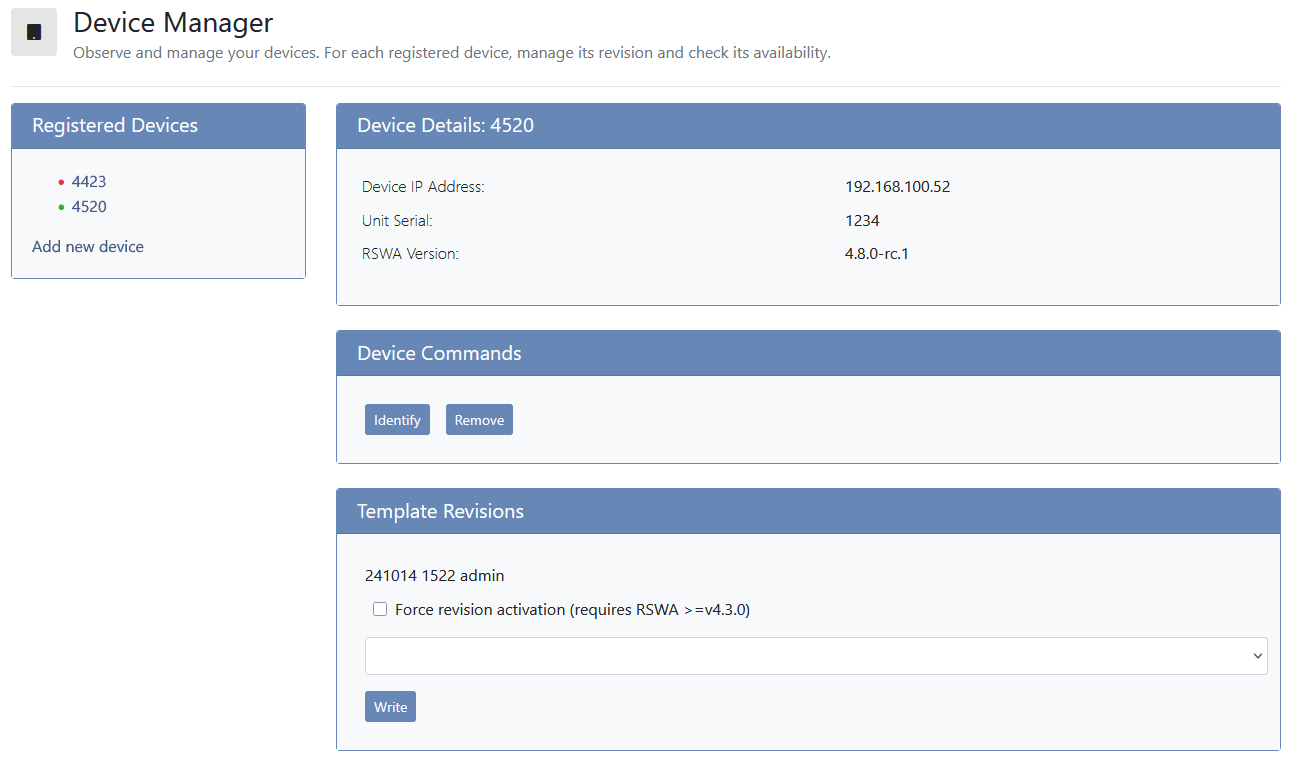
The left portion of the screen features the list of devices connected to TDS. Each bullet point will be colored green if the unit is currently connected, or red if the unit is disconnected.
The right side shows details for the currently selected device, including the device's IP address, the serial number, and the RSWA version.
The device version is only updated when both TDS and the RSWA device are running version 4.9.0 or newer. On older TDS or RSWA versions, the version shown reflects the device's software version at the time it was connected to TDS.
Registering Device
To register a device with TDS, you must first ensure the following conditions are met:
- TDS has been properly configured so other computers can connect to the server.
- The RSWA unit is connected to the same network as TDS.
Once the above two conditions have been met, you may connect the devices to TDS by doing the following:
- 4.9.0 and Newer
- 4.8.0
- 4.7.1 and Earlier
There are two ways to add new devices to TDS.
Device-Based Workflow
This option requires at least version 4.9.0 are installed on both TDS and the RSWA software.
Starting with version 4.9.0, devices can be added by using a pairing mechanism which is similar to the way Bluetooth devices are paired. On the Device Manager page, click on the "Radio" button next to the IP address field and the "+" button.
This will put TDS into listening mode - by default for 30 seconds. During this time, it will accept new registrations from RSWA devices.
Then, on the RSWA tablet, tap on the "House" icon in the status bar and select Change TDS Host. This will open a dialog where you may enter the TDS hostname.
If 30 seconds is too short for listening mode, you can configure this duration in the TDS configuration by modifying the listen-duration-s field, or through the Admin Panel.

Once confirmed on the RSWA device, if TDS is still in listening mode, the device will register itself to TDS.
TDS-Based Workflow
Devices may be added the same way they have always been registered.
Type the name of the devices IP address in the box titled "Device IP Address". You can figure out the IP by selecting the network icon on the device itself, then reading the value under IP.
Once the IP address has been entered, select the + button and the table should update with the new device.
An RSWA device running version 4.9.0 or newer does not automatically communicate with the current TDS using this method. First, a template revision must be sent to the device, or the TDS host must be set on the RSWA as described in the Device-Based Workflow.
Type the name of the devices IP address in the box titled "Device IP Address". You can figure out the IP by selecting the network icon on the device itself, then reading the value under IP.
Once the IP address has been entered, select the + button and the table should update with the new device.
Select Add new device on the left panel. You will be prompted to type the IP address of the RSWA device. You can figure out the IP by selecting the network icon on the device itself, then reading the value under IP.
Enter this IP address into TDS and select Find device. After some time, the device should be connected and the left panel should update.
Send Template Revisions to RSWA
After creating a template revision in Desktop Tools, you can send the revision to the RSWA unit directly over the network.
- 4.8.0 and Newer
- 4.7.1 and Earlier
Simply select your device, then select the revision you wish you send under the Template Revisions dropdown. Then, select Upload Revision.
This will upload the revision to the unit directly over the network. The operator will have to manually activate the revision from the unit itself.
Simply select your device, then under Template Revisions, select the revision you wish to send and hit Write.
This will upload the revision to the unit directly over the network. The operator will have to manually activate the revision from the unit itself.
If both TDS and RSWA devices are running software versions 4.9.0 or newer, the following features are available:
- Revisions may be selected for devices that are offline, which will be automatically sent to those corresponding units once they are back online.
- Verbose feedback regarding revision transmission and activation:
- During transmission, the loading bar will keep spinning.
- After transmission before an operator interaction, the loading bar will stay at 100%.
- A rejected activation will display a marker telling which revision was rejected.
- After activation, the new revision will be shown.
Force Revision Activation
On RSWA units running version 4.3.0 or newer, you can forcibly activate the revision by selecting the hammer button (or by checking the Force revision activation checkbox for TDS versions older than 4.8.0). This will immediately activate the revision without any additional steps from the operator. It will also log them out of any account, requiring them to sign in again.