Managing Inspection Routes
Once weld properties (and optionally images with hot spots) are defined, you can proceed with defining inspection routes. An inspection route specifies which welds are inspected and the order that they are inspected. Each part may contain multiple inspection routes. For example, critical safety welds may be organized in a separate route which then inspected more often when the rest of the welds.
In the original version of the Template Designer, inspection routes were called inspection orders.
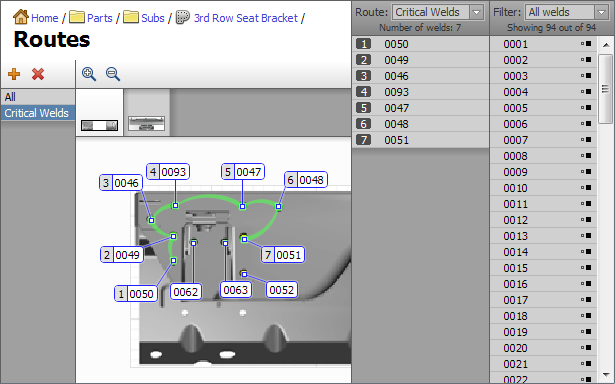
To switch main view to the route display, select a part in the navigation tree, then click Routes in the main area, or expand a part node in navigation tree, then select the Routes node.

The list of currently assigned routes is shown on the left. New routes can be created by clicking the Add Route button or choosing Edit → Add Route from the main menu.
Existing routes can be removed by clicking the Delete Route button or choosing Edit→Remove Route from the main menu.
If you are creating a route that is similar to an existing route, you can click Edit → Duplicate Route to create a copy of an existing route. Then make necessary modifications to it.
The area in the middle shows the graphical representation of the selected route.
Two Weld Lists
There are two weld lists on the right hand side.
- The right-most list shows the sequence of welds that defines the currently selected route.
- The list on the left shows welds that belong to the part and a weld filter box.
Welds can be added to the end of the route sequence by double-clicking in the image or in the part weld list. It is also possible to drag the welds from the part weld list into the route list.
To remove entries from the route, select the corresponding welds, then choose Edit → Remove from Route from the main menu, or use the context menu.