Managing Weld Information
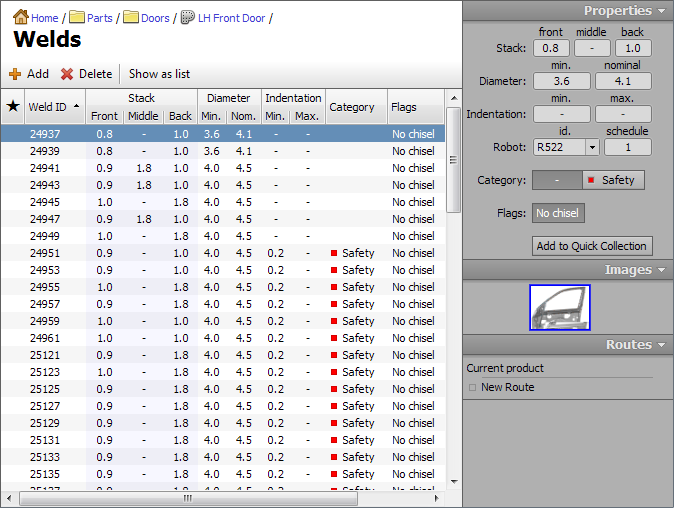
To switch main view to weld information display, select a part in the navigation tree then in the main area, click on Welds, or expand a part node in navigation tree, then click Welds node.
It is also possible to see a list of all the welds defined in the database by choosing All Welds.
The weld information display contains a grid of welds and a property panel on the right hand side. The main grid shows weld properties in a spread sheet like view.

Adding New Welds
New welds can be inserted into the grid by clicking the Add button on a toolbar or by choosing Edit → Add Weld from the main menu.
Removing Welds
To remove welds, select one or more lines in the weld grid and click the Delete button or choose Edit → Delete from the main menu.
Editing Welds
You can modify weld properties directly by clicking and typing a grid cell. Visible columns can be customized from the main menu by clicking on View → Columns.
The data in the grid can be sorted by clicking on the column header, or choosing View → Sort By from the main menu. It is also possible to group the displayed welds by stack, diameter, category or robot.
More than one weld can be chosen for group operations by holding the Ctrl key while clicking on additional welds, or by holding the Shift key to select ranges of welds.
Editing via the Property Panel
The property panel on the right hand side shows a summary of weld properties for the currently selected weld. If more than one weld is selected, it will show properties that are common for all the selected welds. By editing the data in the property panel while multiple welds are selected, one can assign the same property to all the selected welds.
Quick Collection
The very first column in the weld grid shows indicates whether the weld belongs to a quick collection. Welds can be added to or removed from the quick collection by clicking on the grid inside this column or by toggling Add to Quick Collection/Remove from Quick Collection button in the property panel.
Printing
The content of the grid can be printed by choosing the Print option from the main menu. The printed report will show the same welds and data columns as the grid on the screen.
Automated Tasks
It is possible to perform certain automated tasks on selected weld entries. To get started with automated tasks, choose one or more welds, then select Edit → Apply Formula from main menu.
In the current version of software the following automated tasks are available:
- Calculate nugget diameter: allows to set values for minimal and nominal diameters automatically from plate thicknesses using common formulas such as
4√GMTand3.5√GMT. - Flip weld: allows swapping of front and back plate thicknesses for selected welds.
Importing Data
To import existing weld information stored in a spreadsheet: copy cells from a spreadsheet into a clipboard, then choose Edit → Import from Clipboard from main menu.

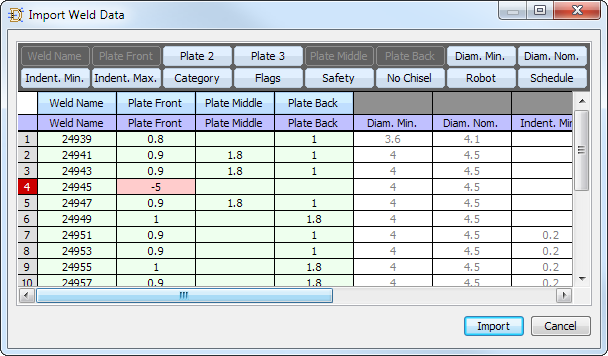
The Import Weld Data window consists of the following parts:
- The dark grey bar at the is a Descriptor Repository that contains available descriptors for different columns.
- The Column Descriptors row contains descriptors assigned to various columns of imported data.
- The Header Row contains column header cells from imported data.
- The rest of the numbered rows are the imported data cells.
Use the mouse to drag the column descriptors from the Descriptor Repository onto the Column Descriptors row to specify column types. For example, in the image above, the first four columns are attributed to Weld Name, Plate Front, Plate Middle, and Plate Back. The rest of the columns are not assigned and their content will not be imported. The layout of columns is saved between the sessions. Next time you perform the import, it will try to use the previous column layout.
As a bare minimum, you have to specify which column contains the Weld Name value. Existing welds with matching names will be updated with new values, otherwise new welds will be created. If your imported data contains plate thicknesses for 2T welds in first two columns leaving the third column empty, use Plate Front, Plate 2 and Plate 3 descriptors. If your 2T plate thicknesses are stored in first and third column, leaving the middle column empty, use Plate Front, Plate Middle and Plate Back descriptors.
If the imported data already contains a header row, the software will try to automatically recognize it and automatically exclude this row from import. Otherwise, you can drag the header splitter with the mouse to specify which rows contain header information, the rest of the rows will be imported.
All the data is validated before actual import is performed. In the example above, row number 4 contains invalid value for the front plate thickness. The row number is highlighted with red and the cell which did not pass validation is highlighted with pink color. The rows that did not pass validation will not be imported.